Having decided to develop my own black and white negatives at home – partly to save a little money but mainly so I could experiment with film/developer combinations to find a combination or combinations I liked – I was then left with the problem of how best to convert the negatives into prints.
I had already decided I didn’t want to get back into the whole darkroom set up that I once had. That meant that the best route for me was to scan the negatives somehow and then invert and adjust the digital images so I could either print out the results myself or send the files off to be printed elsewhere. So, how best to scan the negatives.
Warning. I am aware that what I describe below isn’t a proper scientific test and that the conclusions are subjective, but, I did it for my own interest.
As a trial I took one negative and tried different ways of scanning the image at home with equipment I already had and then comparing the images with the result I had gotten from commercial scanning. In all honesty I didn’t expect any of the home solutions I had available to be satisfactory.
As well as the commercial scan, the other methods I used were:
- Scanning on a fairly cheap flatbed scanner (HP Photosmart 5520 All-in-one) covering the negative with a sheet of white paper and shining a lamp on that to provide a suitable backlight. I used the maximum resolution of the scanner which was 1200 dots per inch.
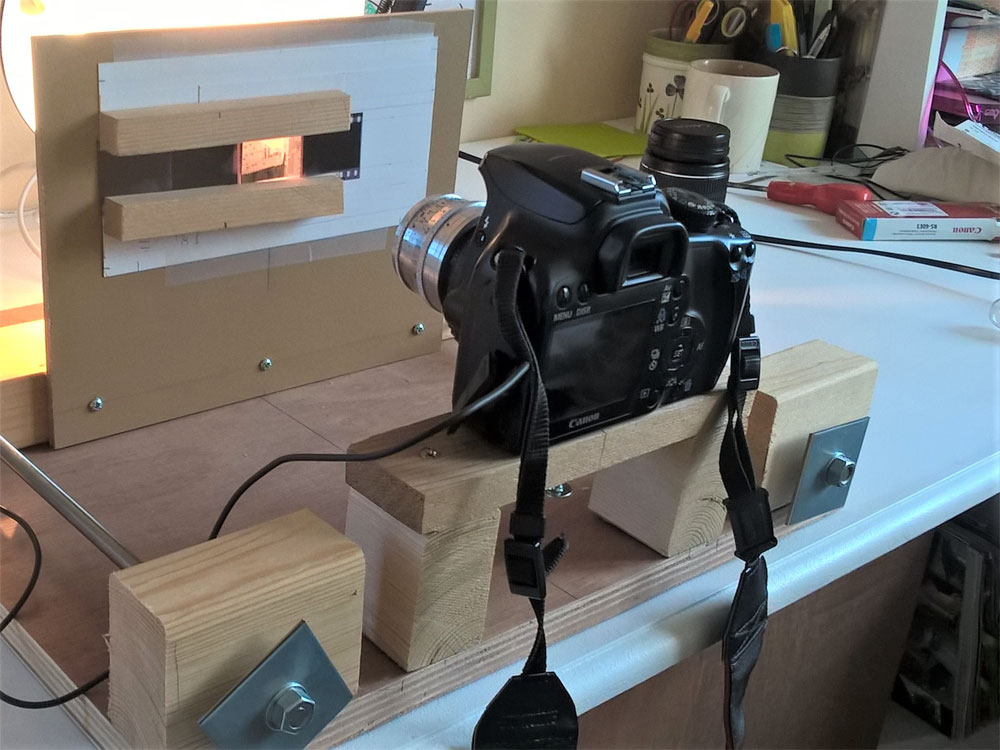
- Photographing the negative using a Canon 1000D digital camera which I had fitted with the Jupiter 8 lens from the Zorki. I managed to do this by glueing a plastic Canon body cap to a 39mm lens rear cap and then cutting a hole in the resulting adaptor for the image. By chance this also moved the lens to where its focus was just about right to get more or less the full frame onto the sensor. The negative was mounted and back lit and the image captured in RAW setting the lens to f8 (in the hope that this would be around its sharpest aperture). Focusing was difficult to say the least even when using ‘live view’. There’s a picture below of the adaptor I made and the very Heath Robinson rig I put together to use it.
- Following on from a blog I had seen ( https://cameralegend.com/tag/how-to-scan-film-without-scanner/ ), the third method I tried was to backlight the negative on a light table (really just a low wattage bulb behind some white plastic) and photograph it with my mobile phone (Lumia 640, i.e. nothing special). I got as close as the auto focus would let me and took a couple of shots refocusing between them for good measure.

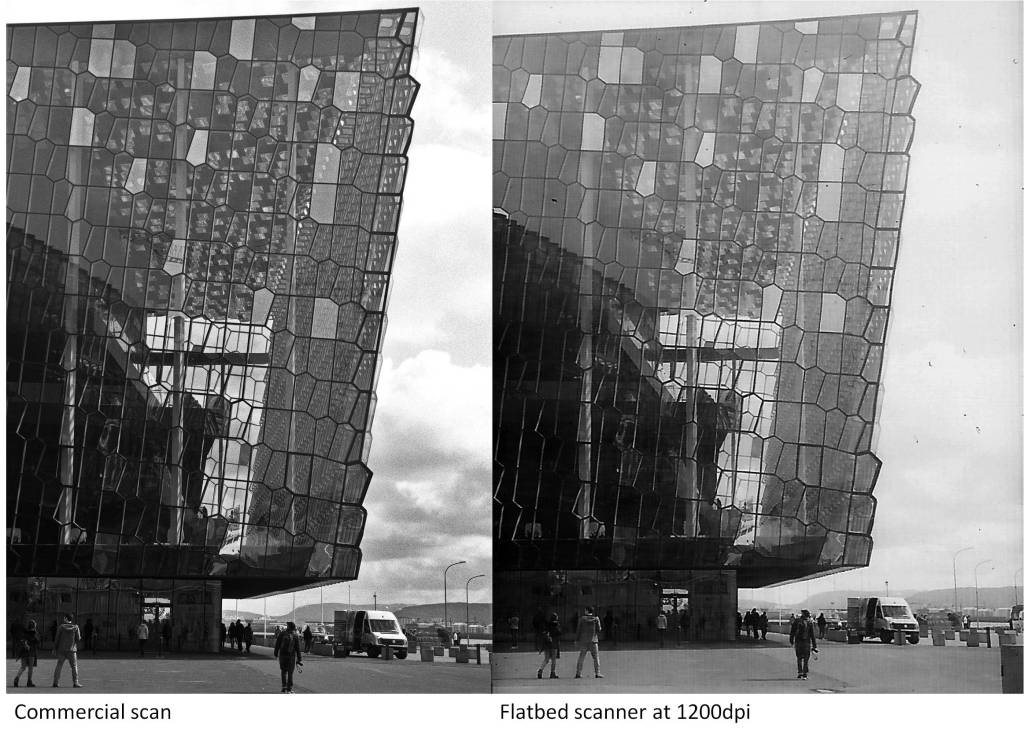
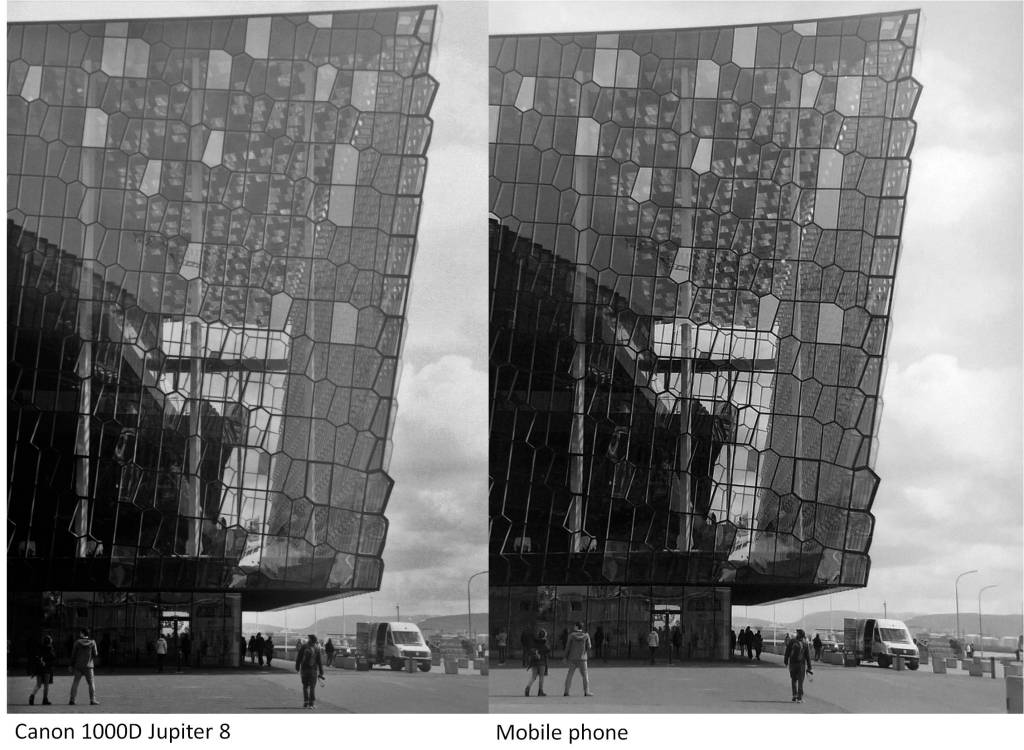
Here are the results of all of the scans after inverting and adjusting the levels so that both ends of the scale are on the point of clipping:
To be honest, looking at the results displayed on the screen side by side, I was surprised that the differences weren’t greater given the fact that I spent virtually no money on this.
My overall conclusions are this:
The commercial scan (6.3 megapixels), as expected, produced the best overall result. There is detail in both the shadows and the highlights with an acceptable overall contrast.
The flatbed scanner has given the least pleasing result in that much of the detail in the highlights has been lost as well as some contrast. Also given the resolution of the scan (it should be 1200 x 1800 pixels), it is the least resolved image which most likely wouldn’t stand up to enlargement.
The Canon 1000D photograph gives an overall acceptable result, there is a little loss of contrast which was difficult to recover without giving an unnatural look to the image. The detail also looks a little soft, probably a result of the Jupiter 8 lens used and because no sharpening has been applied. The negative filled the viewfinder so made full use of the 10.1 megapixel sensor.
The mobile phone image, I think is astonishingly good when you consider how quick and easy it was to obtain. I’m not sure it would stand up to much enlargement as the image of the negative only took up less than half of the picture (say about 3 megapixels out of 8 megapixels) but it is a quick way of looking at your film to decide which pictures to scan under better conditions.
Here are some enlargements of a section of the above images:

Once the images are enlarged the superior quality of the commercially scanned image stands out. The flatbed scanner image is showing horizontal bar artifacts from the scanning process, the Canon image is just softer and shows less detail and while the mobile phone image at first sight is the second most acceptable it is showing halo type artifacts most likely from the image processing in the phone. Add to this the fact that the native resolution of the images from the flatbed scanner and the mobile phone is significantly less than the commercial scan or Canon images thereby reducing their potential for enlargement.
Probably I could have got more pleasing results had I spent more time ‘correcting’ the images but I wanted to do a simple comparison of the scanning methods. Also, I am sure that if I had had better equipment to hand I could have obtained better results with each of my home brewed alternatives. Certainly there are better scanners out there and the use of a digital camera to capture negatives as an alternative to scanning is becoming more popular. With suitable equipment (perhaps a more modern camera and a macro lens) I am sure I could have got much better results. I just don’t have that equipment available to me.
So I still need to solve this problem although for now I can at least do something to convert my negatives to view them even if it’s not good enough to give me photographs I can enlarge. I’ll just have to wait and see if Santa has any ideas on what to do next.
