Pinhole Camera: Part 4

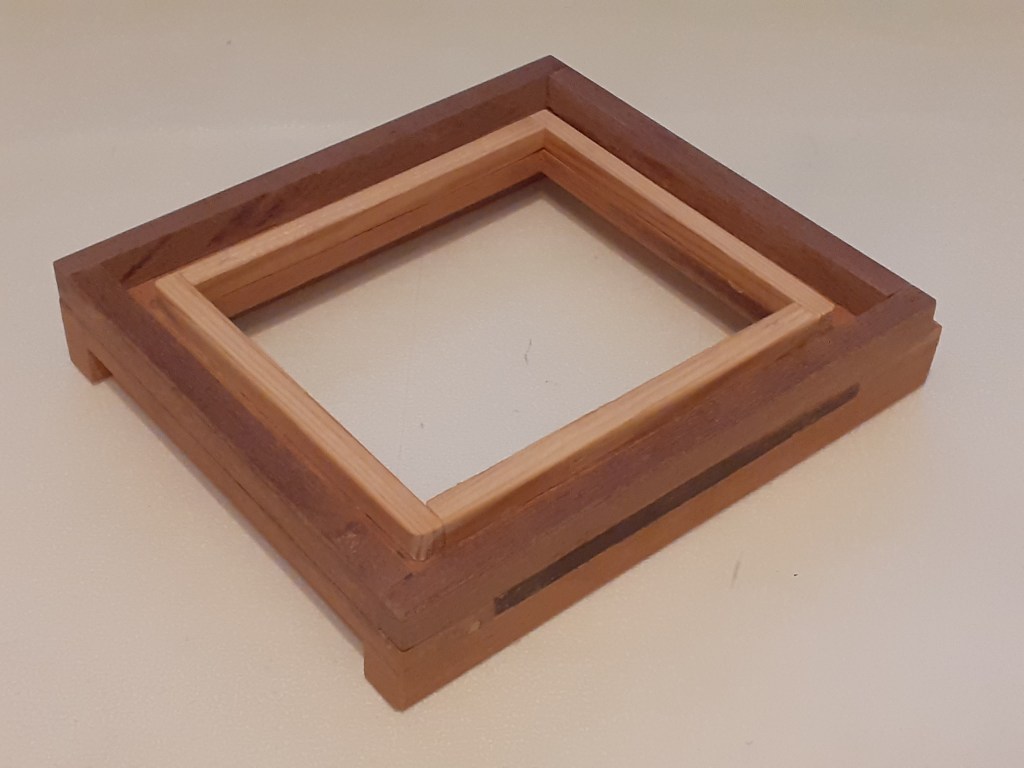
Once my pinhole camera was finished the next decision was should I use film or paper for the negatives? To be honest for me it was a fairly simple decision.

I had made a pinhole camera really just to see if I could do it and then I planned to use it to decide if I wanted to go into large format photography. So the next thing I needed was to show that the camera worked without spending too much money.

For me the pro and cons for film vs paper negatives were as follows:

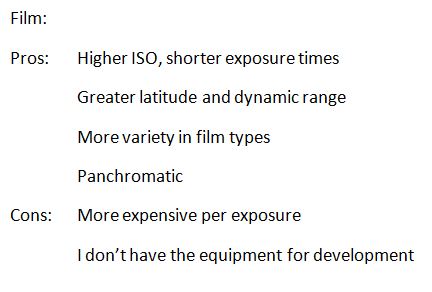
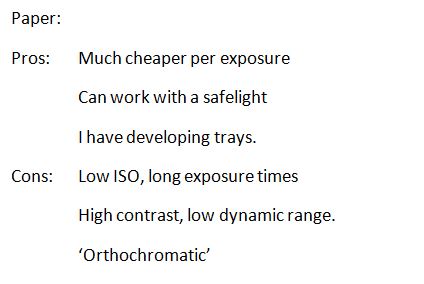
For me it came down to mainly cost in that the paper is much cheaper to buy than film and apart from developer I didn’t need to buy anything else as I already develop my own black and white films and I had converted a small cupboard into a very rudimentary darkroom. Enough space to cut up paper and develop the negatives in the lightweight plastic trays that you buy mushrooms in.

I also knew from reading around the subject that I could potentially reduce the high contrast of paper to a degree by pre-flashing. (I suggest you look it up – there’s plenty of info out there that explains it all much better than I can). Also, preflashing has the effect of increasing the ISO rating – not by much, maybe from around 6 to 12. The high contrast and high sensitivity to blue light that paper has can also give the results a vintage look, something I thought I could live with for the time being.

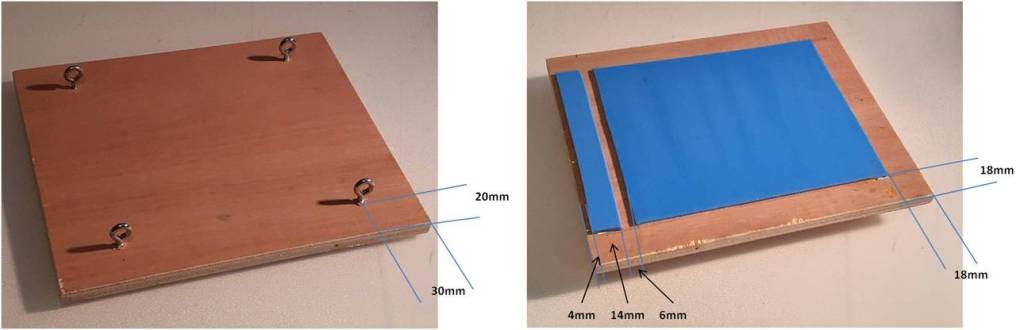
I cut a sheet of 8×10 Ilford Multigrade RC glossy paper into four sheets 100mm x 125mm. (Note that 4×5 format for some reason isn’t actually 4 inches by 5 inches- if you cut the paper into 4×5 inch sheets they won’t fit the film holder).

I then did a pre-flashing test and found that, for the light I used (a 15w bulb in a box which shone through three sheets of ordinary office paper to reduce the brightness), I needed 12 seconds to give a barely visible shade of grey to the developed paper. I then loaded two 100x125mm sheets of paper into the film carrier and pre-flashed them each for 10 seconds.

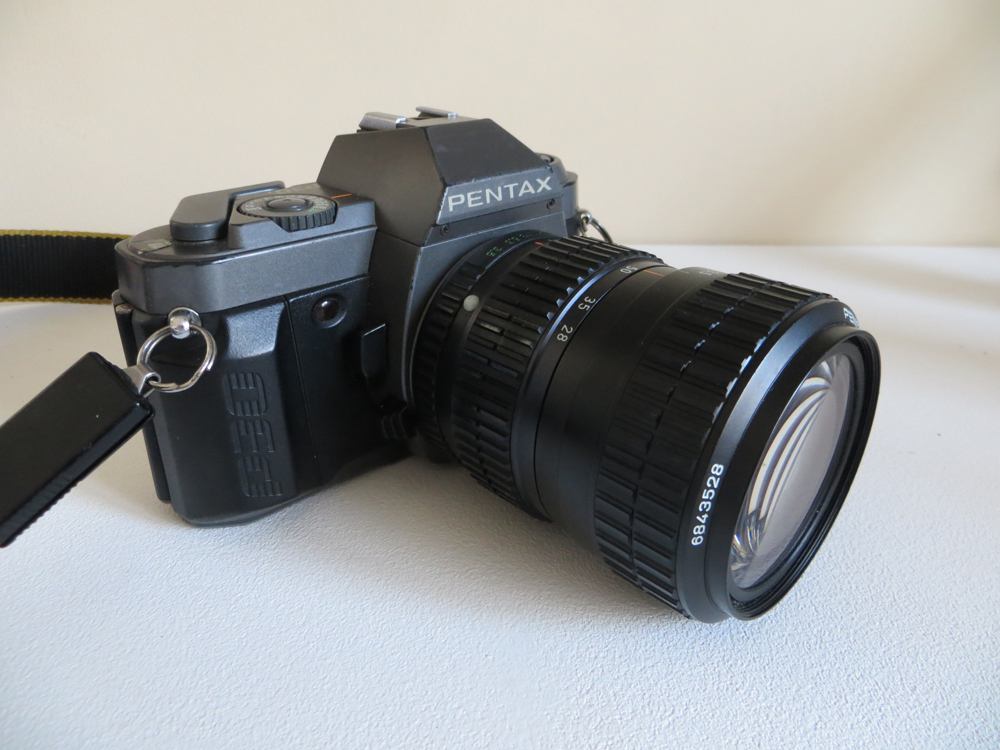
If you remember the pinhole in my camera gives me an aperture of f204. The exposure app on my phone tells me that for an exposure value of EV10 for ISO100 film I should use 1 sec at f32.

Adjusting for the paper ISO I counted backwards, 100 – 50 – 25 – 12 – 6, i.e. 4 stops for ISO 6, 16 seconds respectively

Adjusting for the aperture I did the same, 32 – 45 – 64 – 90 – 128 – 180 – 256, i.e. 5stops for f180 and 6 stops for f256. So for ISO 6 that would be 512 and 1024 seconds respectively. So I guessed at about 720 seconds for f204.

From these calculations I made this table which I intended to use to guide my first exposure:

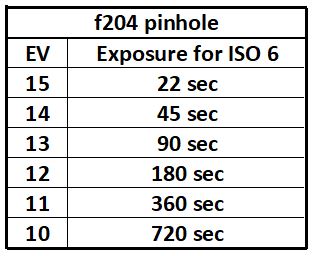
The idea behind this was to use my phone app to measure an exposure value for my first photograph and use the chart to pick a base exposure and then bracket it to get a better idea of what ISO the paper is and what exposure to give.

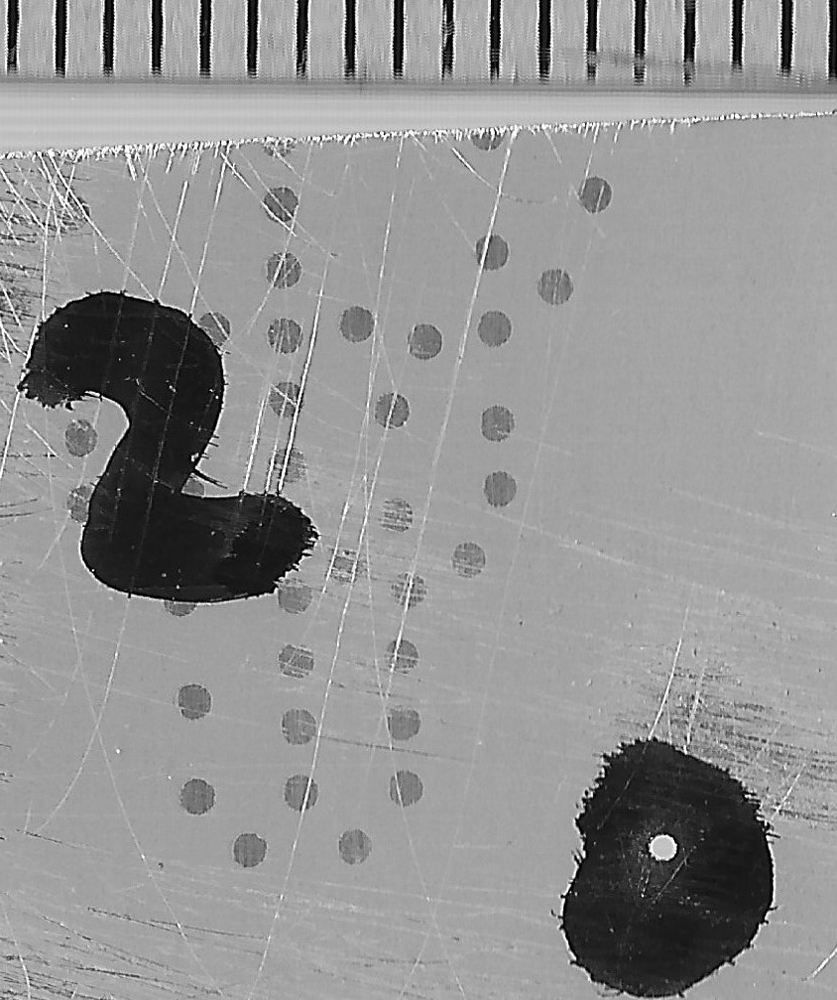
I set up the camera and measured an EV of 12, so for ISO 6 I would need to give a 180 second or 3minute exposure. I pulled the dark slide out ~1 inch and gave a 1min exposure, pulled the dark slide another inch and exposed for 1min and again and finally pulled the dark slide right out and exposed for 2min. This gave me a test strip with 2min, 3min, 4min , 5min and 6min exposures.

I developed the test strip and scanned it (also flipped and inverted the image), see below:

Trial exposure 6 – 5 – 4 – 3 – 2 minutes
Trial exposure 2 – 3 – 4 – 5 – 6 minutes

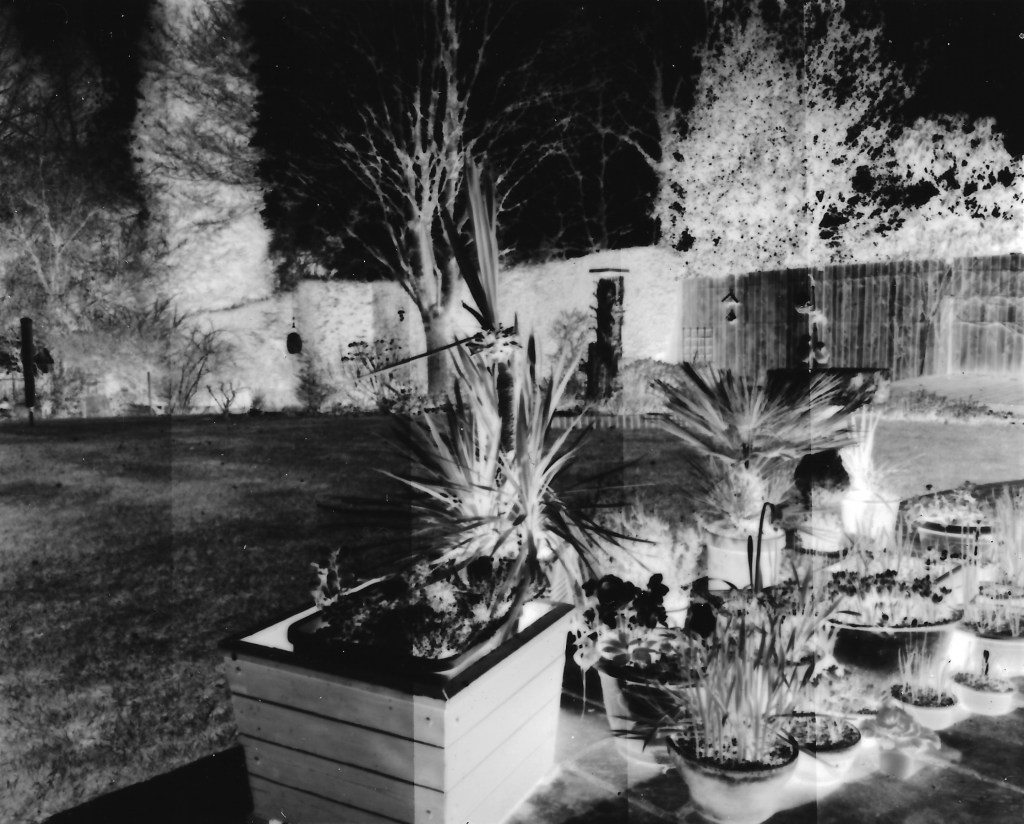
From these I chose the middle strip (4 minutes) as my exposure for the photograph, so it looks as though in my hands Ilford Multigrade RC has an ISO of around 5-6 even when preflashed. Good job I did a test strip.

During the actual exposure of my first test exposure I realised that the light had faded a little so I added on another minute to compensate (guesswork really)

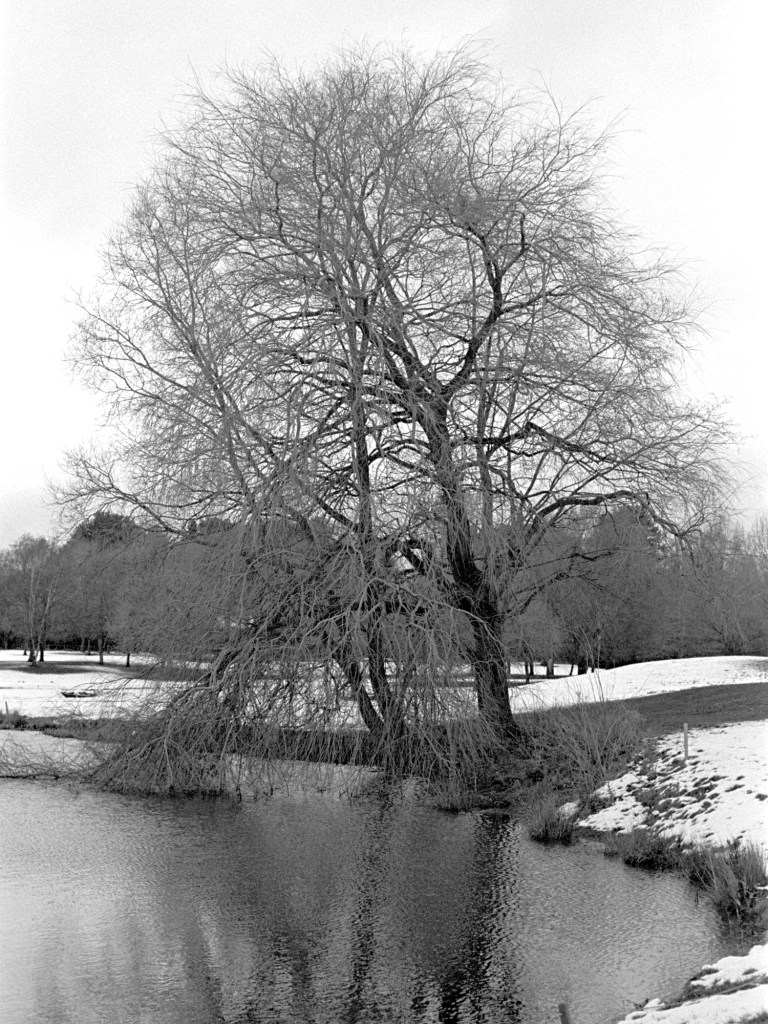
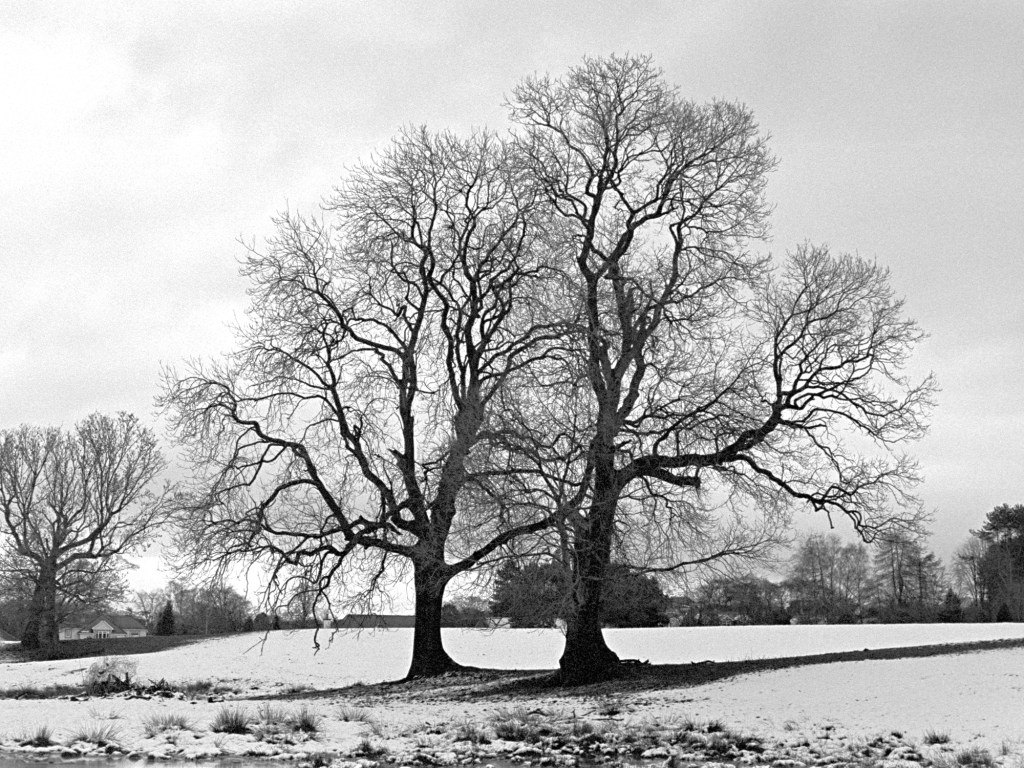
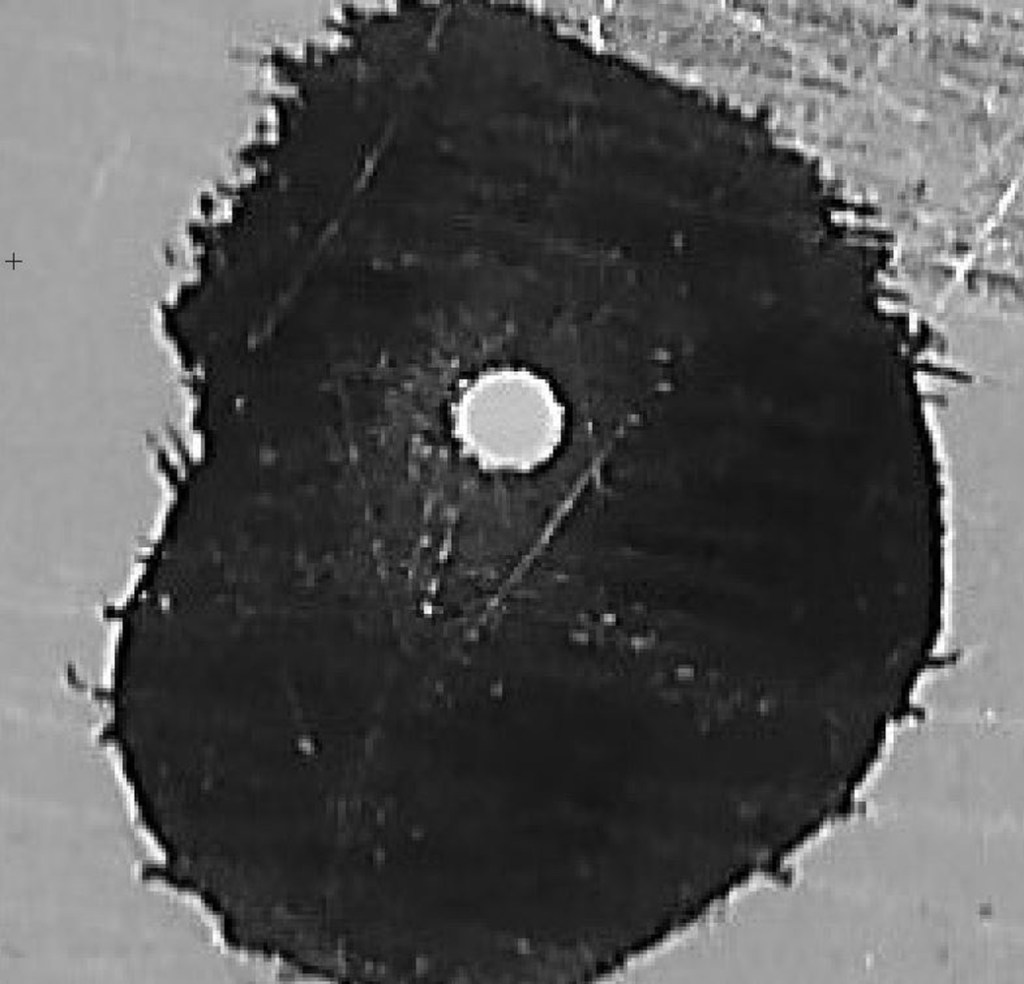
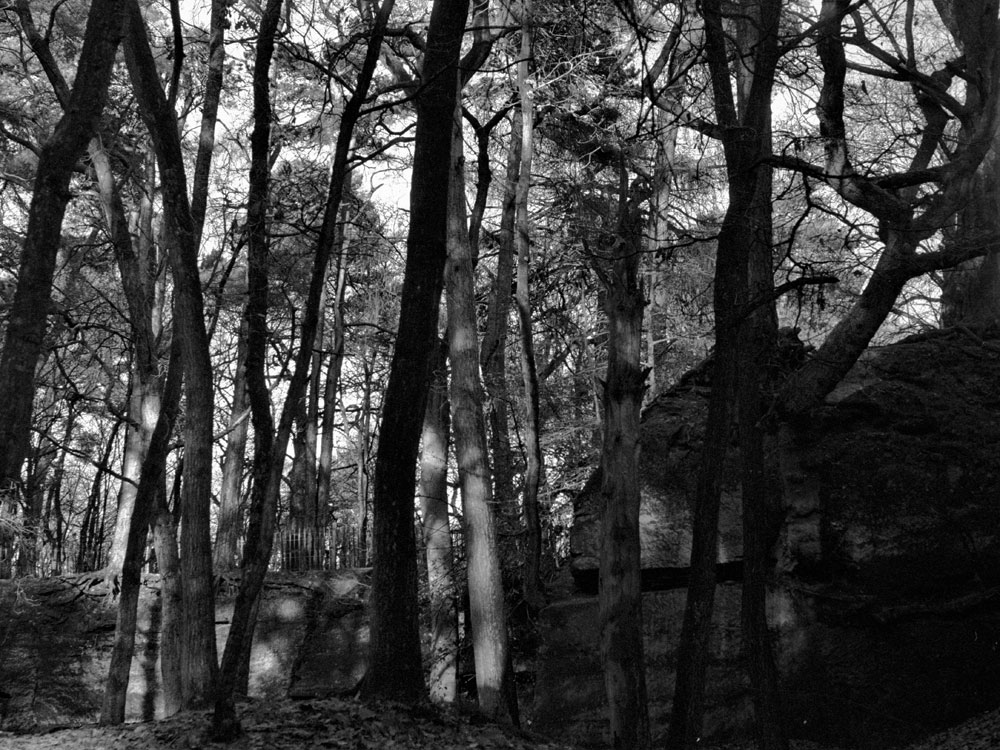
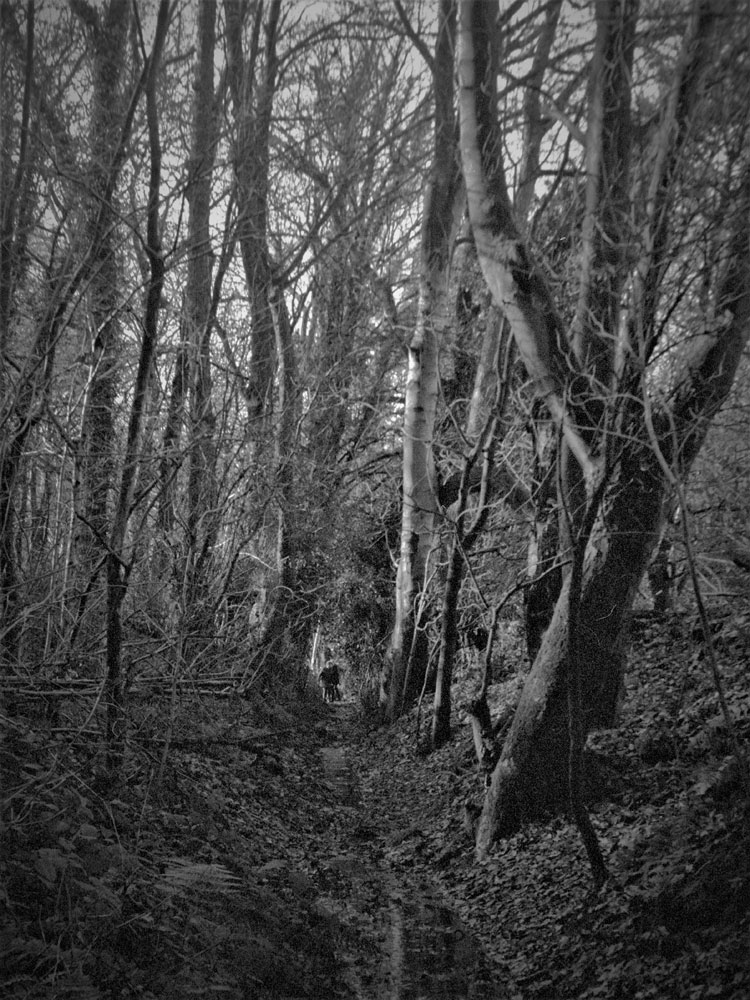
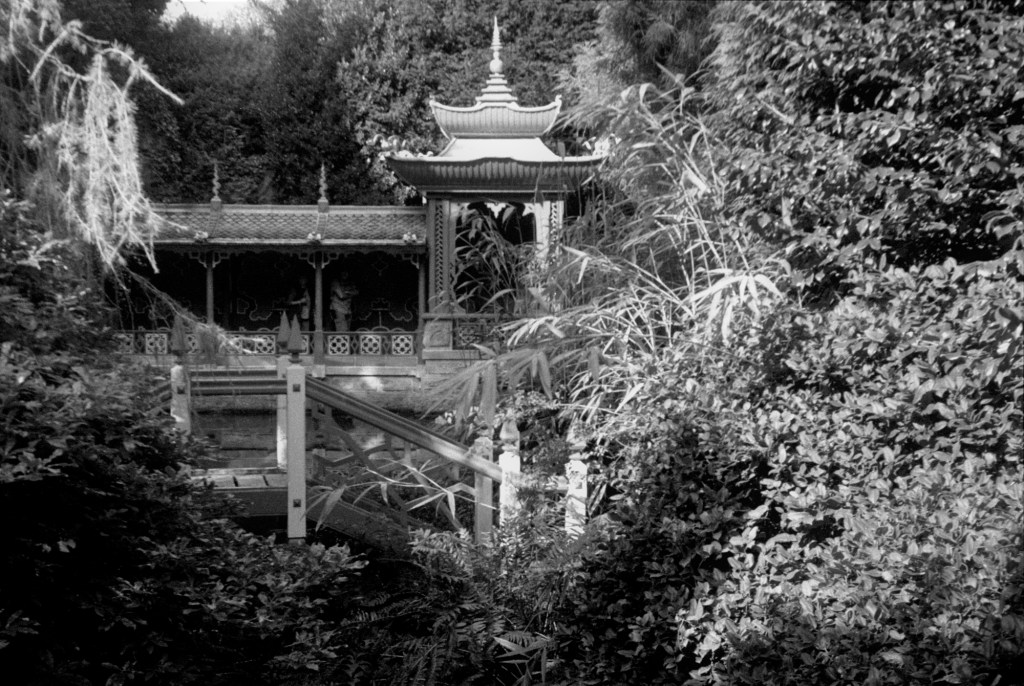
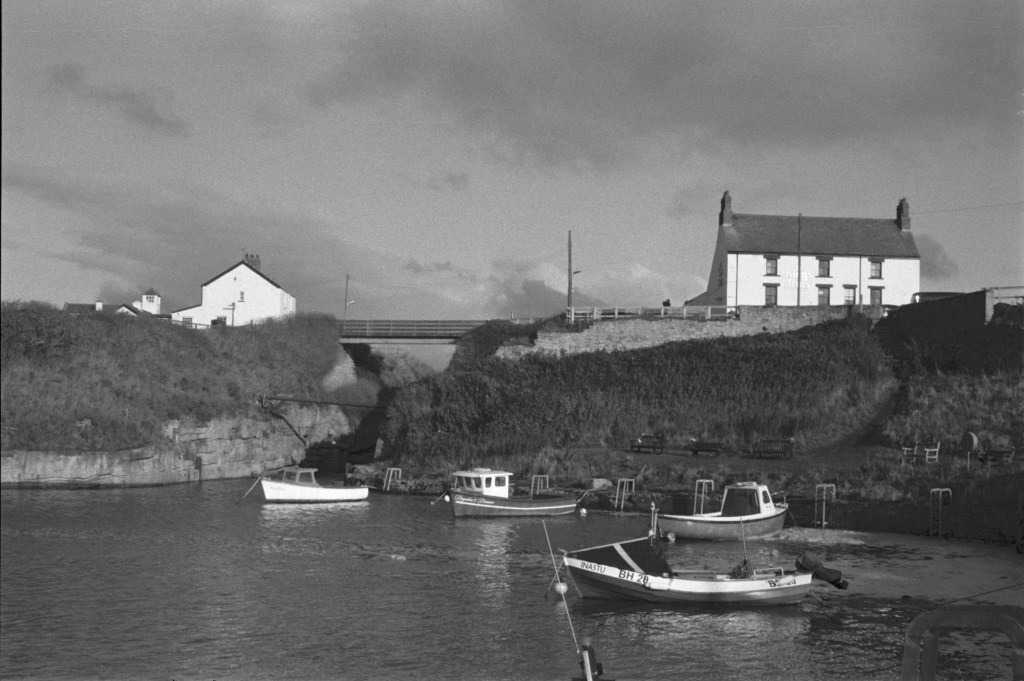
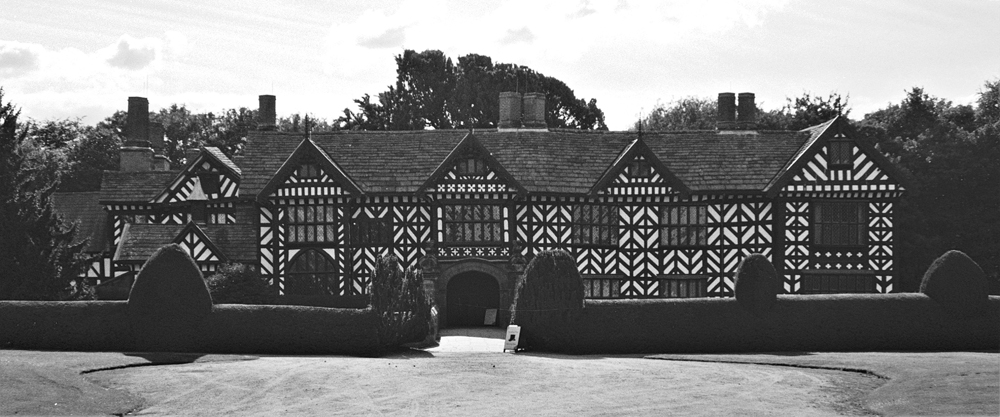
Here’s the final image I obtained (no digital enhancement except for flipping the image and invertion to make a positive).

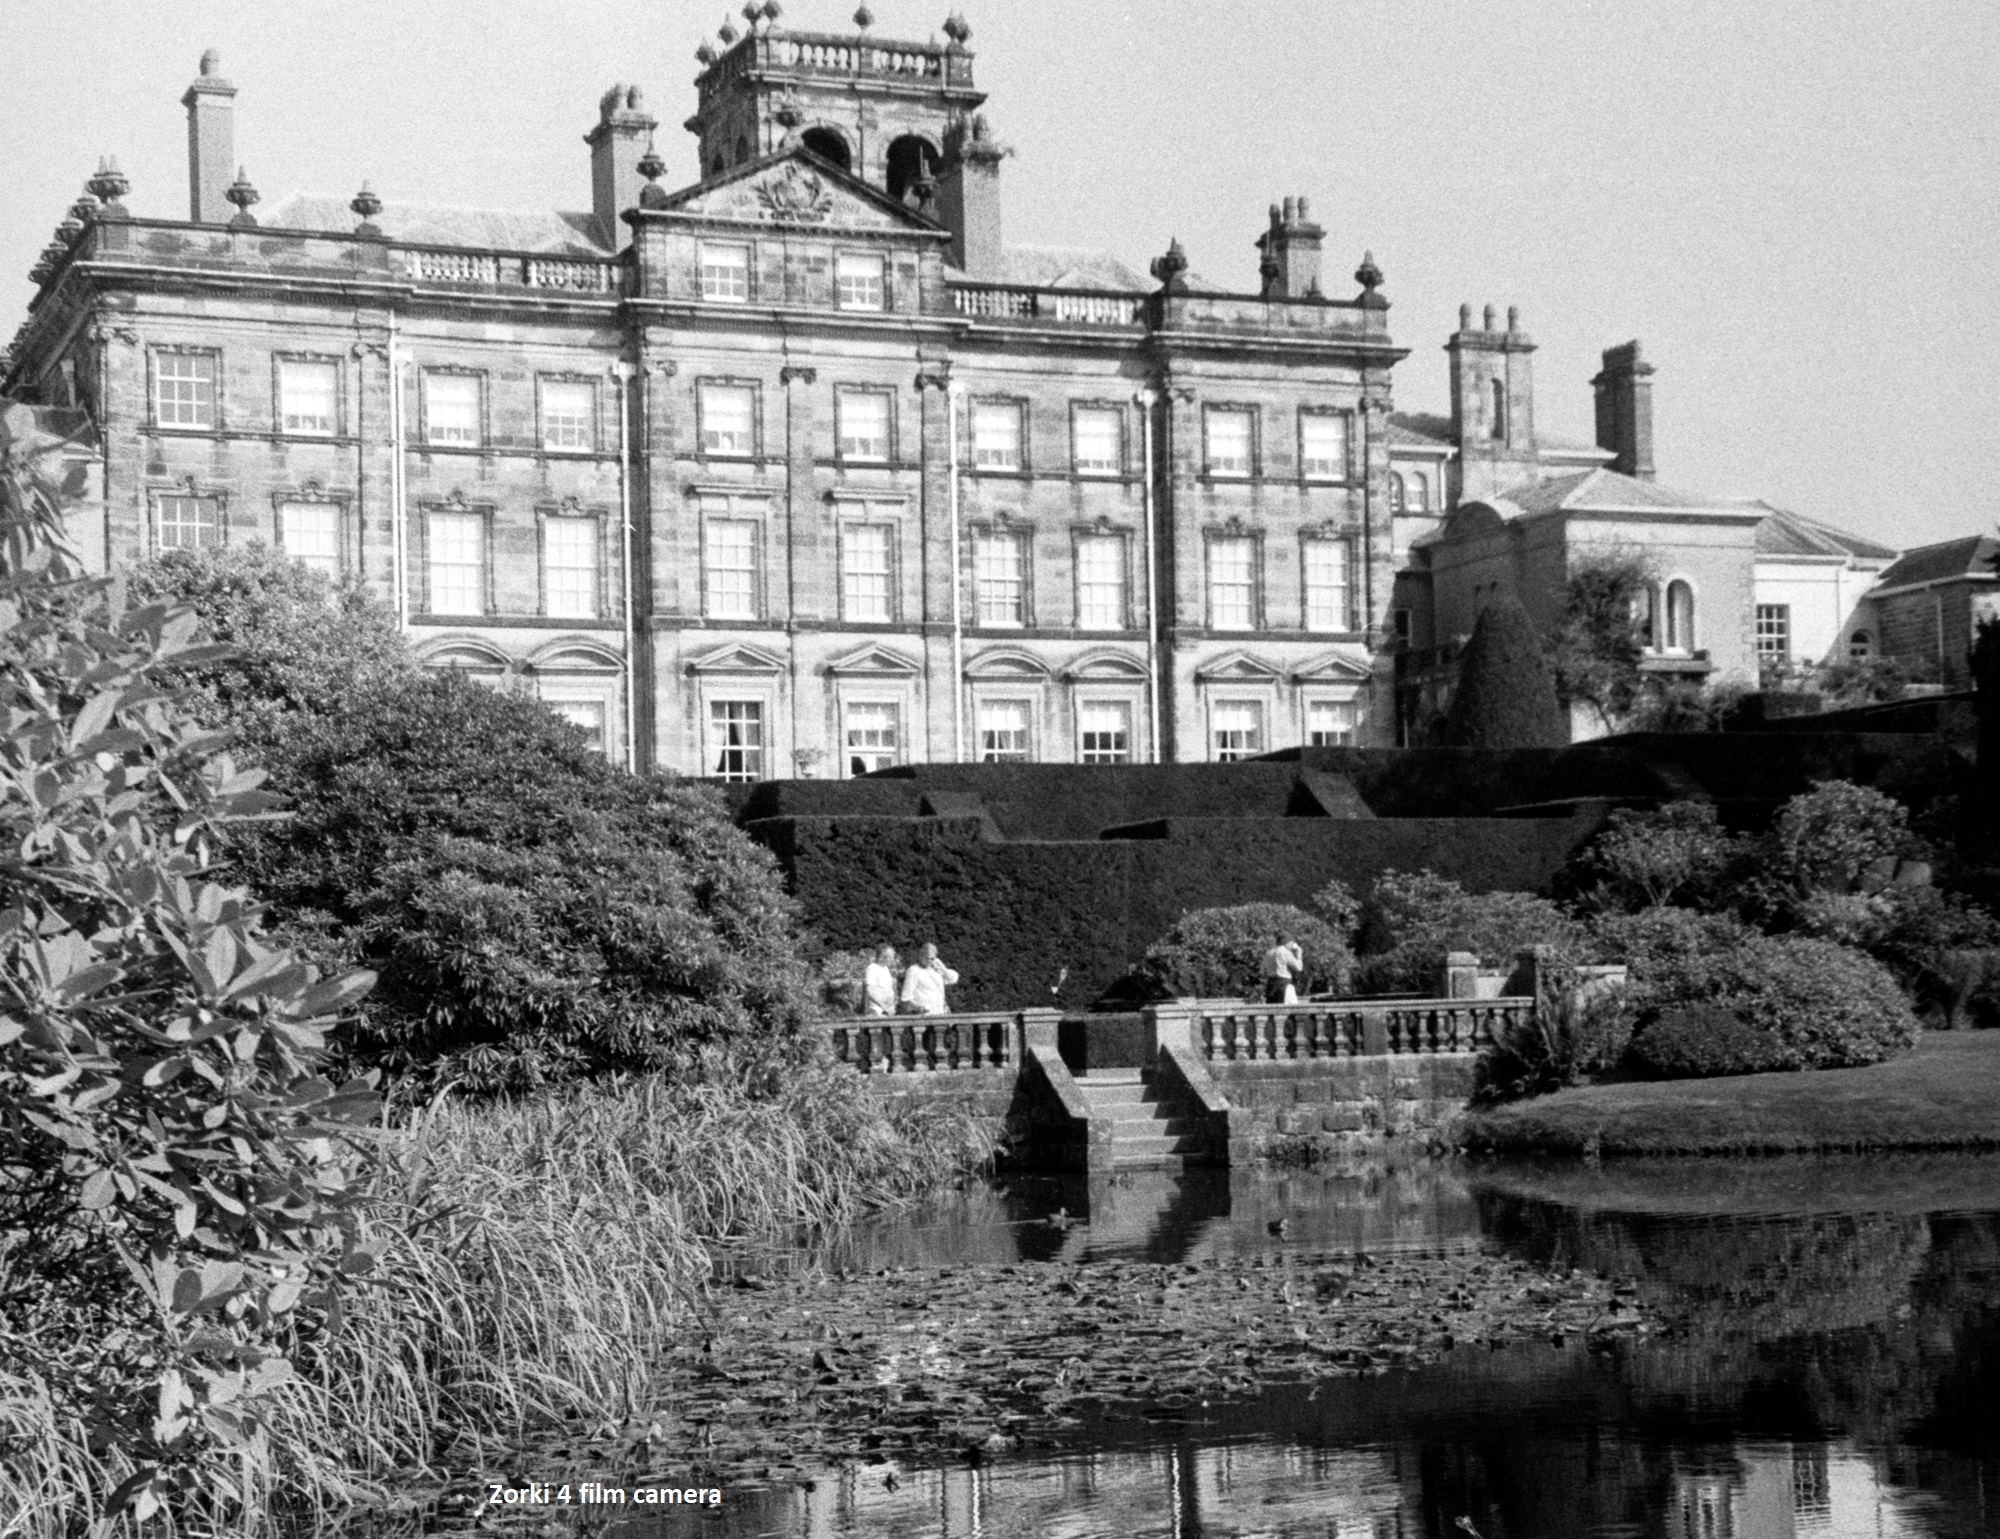
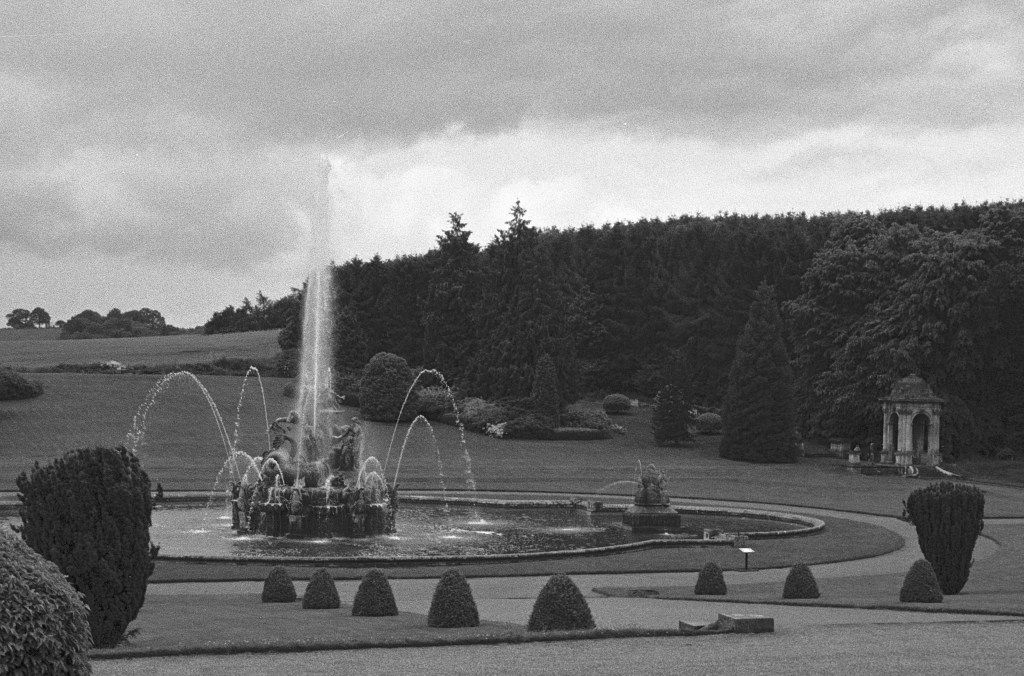
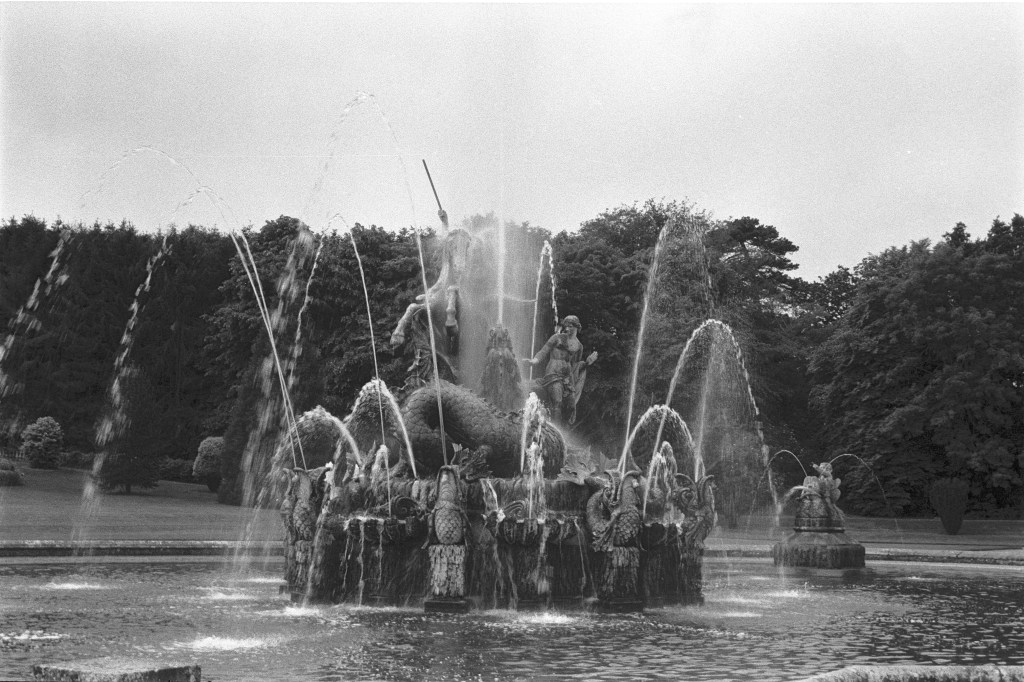
So there we have my first photograph from my pinhole camera (it’s just a view of the garden and not intended to have any artistic merit) but it does show that the camera works and I don’t seem to have any light leaks thanks to the light traps in the design.

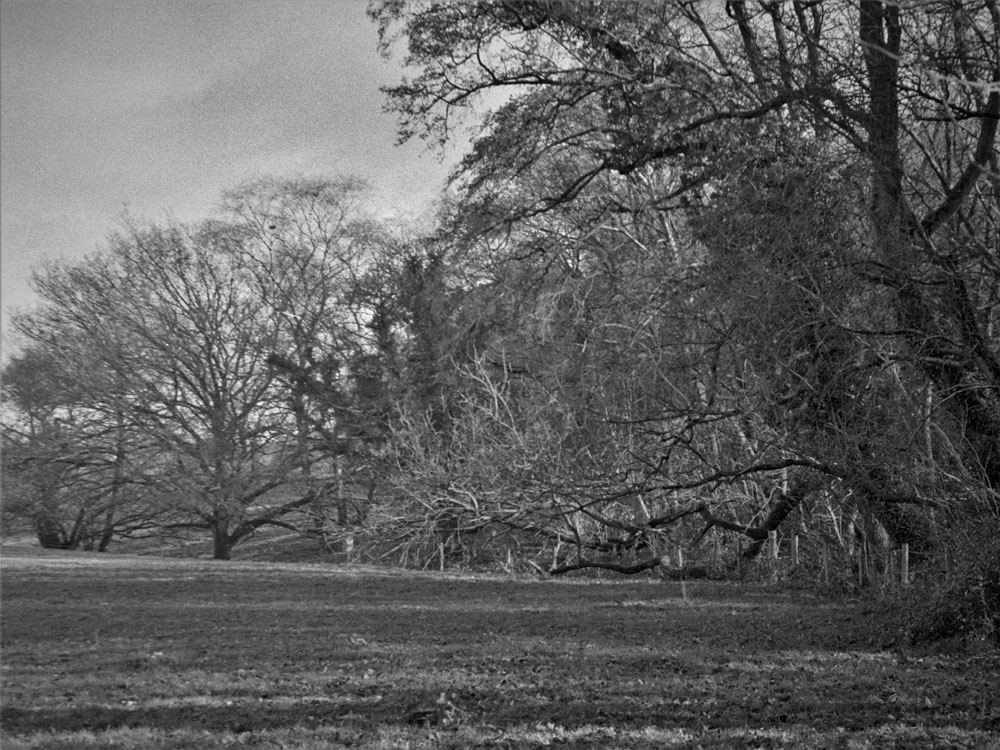
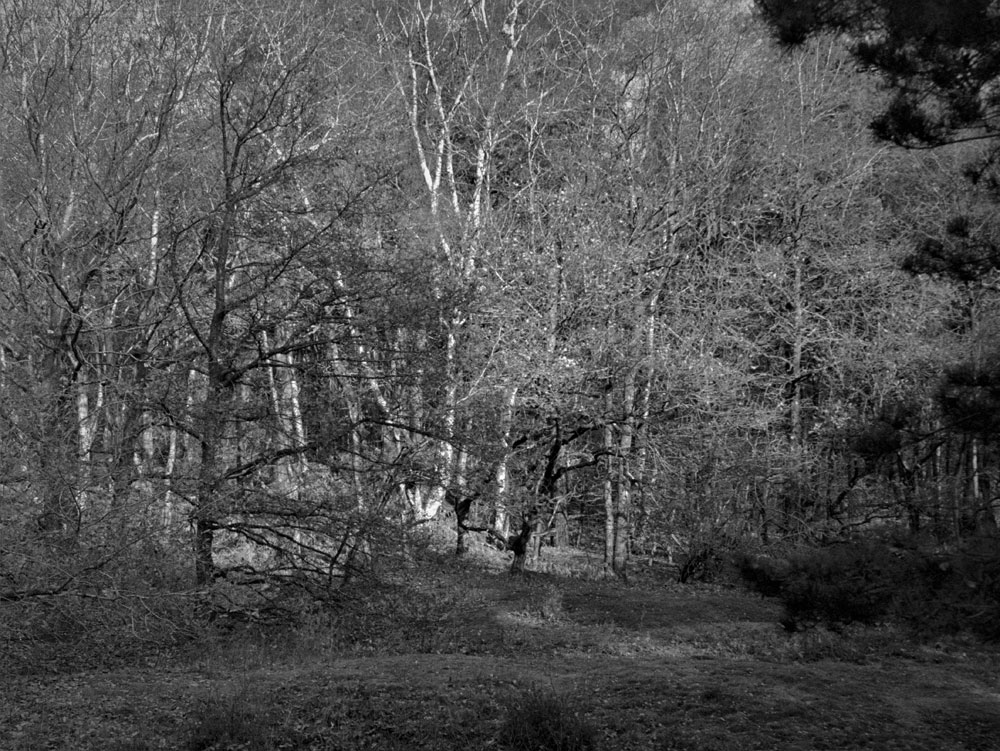
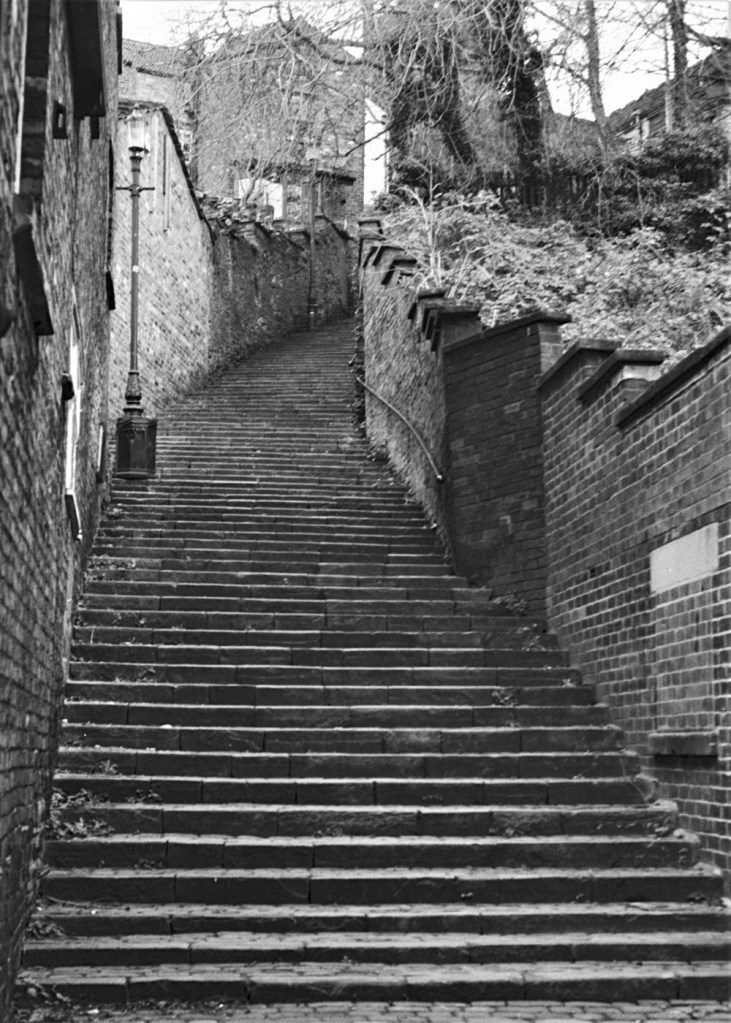
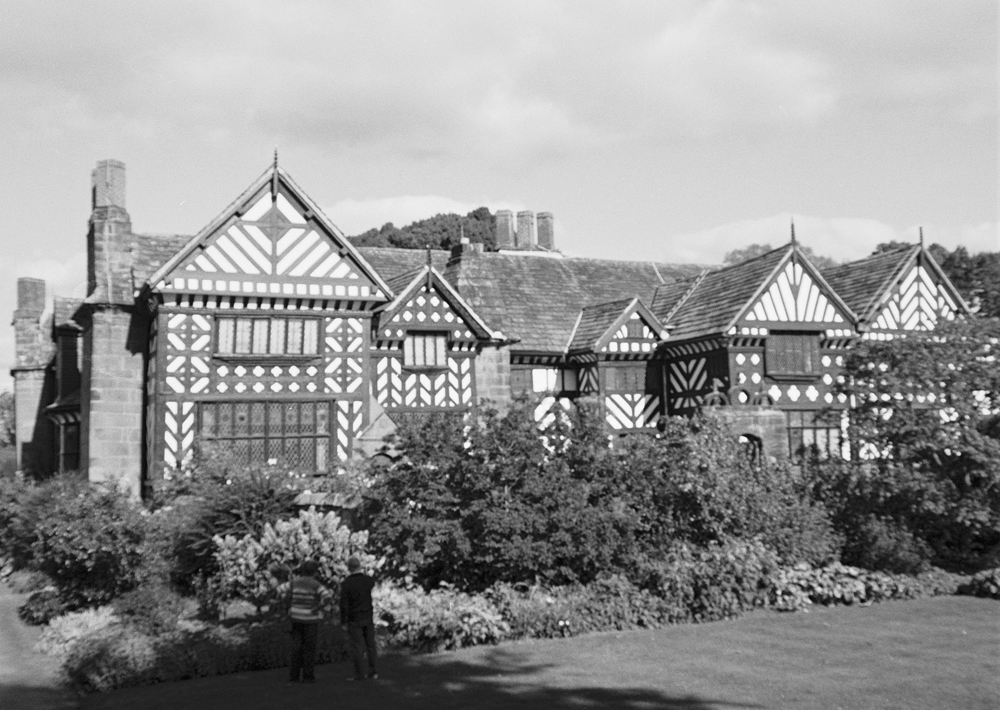
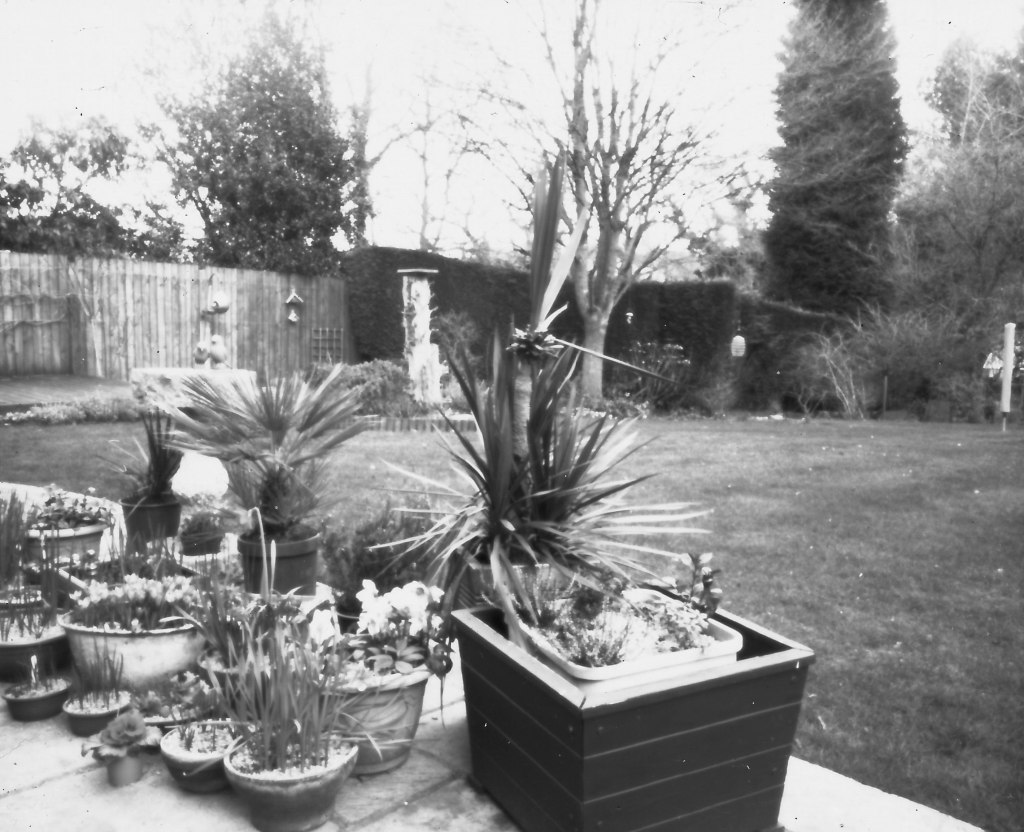
For comparison I took a photograph of roughly the same view with my mobile and cropped it as best I could to cover the same area.

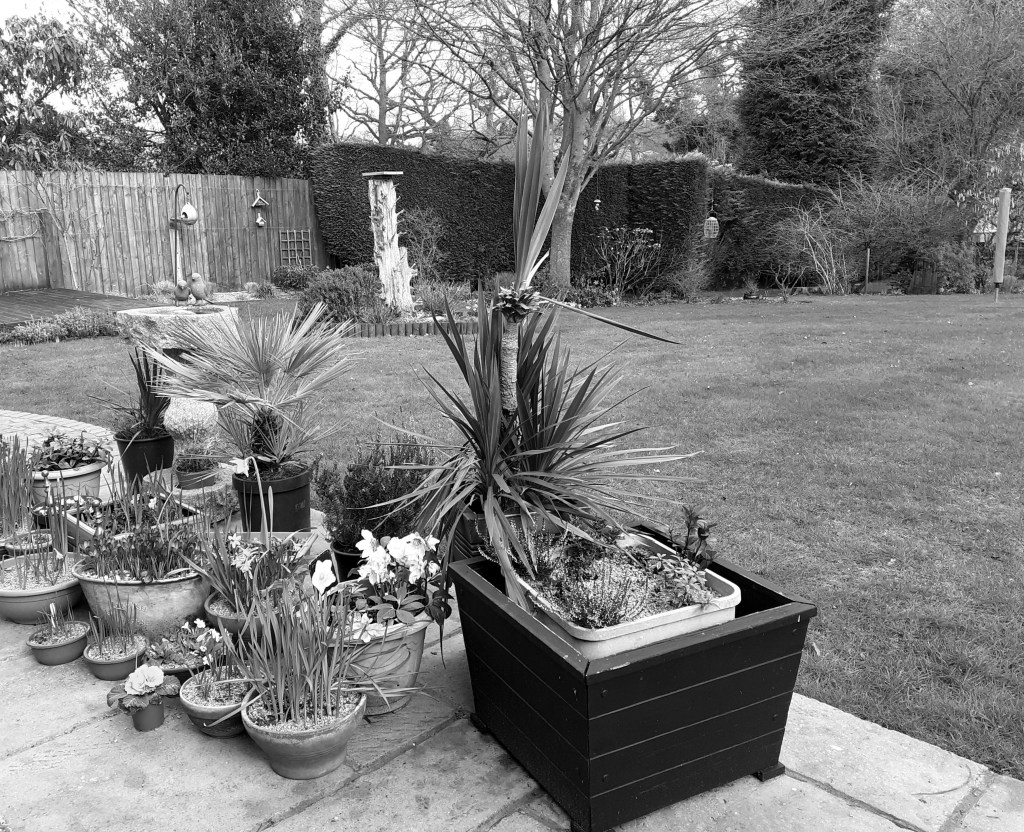
The most obvious thing here is the high level of contrast in the pinhole/paper negative image with blown out highlights which is not really surprising. I am a little disappointed that the image isn’t sharper although I wasn’t expecting it to match the mobile image as I am aware that my phone applies a lot of sharpening to the image anyway.

I sure I could fiddle with the image in Photoshop and get something that appears a little sharper looking but that’s not the point is it.

(The paper used was Ilford Multigrade RC Glossy, developed in Ilford Multigrade developer 1:10, citric acid stop bath and fixed in Ilford Rapid Fixer 1:10 and the negative was scanned at 600dpi using HP Photosmart 5520)

A walk in the snow.

We’re back in lockdown but that means we can still go out locally for a walk as I did the other day after there had be some snow the day before. Where I live there is a walk I can take which skirts a golf course and goes across some fields and ultimately down into my village. I took my Pentax P30T loaded with Kodak Tri-X with me and took some photos.

I hadn’t realised it at the time but I almost exclusively photographed trees – I guess I liked the starkness of the trees against the sky and the snow covered ground.

I did make one big mistake taking the photographs in that I didn’t compensate for the fact I was photographing snow covered fields, that meant that all of my photos were at least one stop under exposed. I did manage to recover some of that in Photoshop but if I tried to make the snow any whiter the images began to look false.

The film was developed in D76 as recommended and scanned with a Plustek OpticFilm 8100 scanner.

St Peter’s Church and Norman Chapel, Prestbury.

The village of Prestbury in Cheshire was once notorious for being home to a high proportion of millionaires and professional footballers. It still has some well known inhabitants but it also has St Peter’s Church and its associated Norman Chapel.

At the end of the 12th century the local Anglo-Saxon church was demolished and what is now the Norman Chapel was built and served as the place of worship for the parish of Prestbury.

In 1220 work on the current church began just a little way away from the Norman Chapel. The new church, St Peter’s has been enlarged and remodelled many times over the centuries while the Norman Chapel was allowed to fall into disrepair. In 1592 the chapel was sketched by the artist Randle Holmes as a roofless ruin. In 1747 the chapel was rebuilt and restored and new windows added as recently as 1977. Probably the only visible parts of the orginal that can be seen now is the doorway.

I decided to go and photograph the Church and Chapel using my Pentax P30T with 28-80mm zoom lens using Kodak Tri-X shot at ISO400.

The film was developed in D76 as recommended and the negatives scanned with a Plustek OpticFilm 8100 scanner.

Pinhole camera: Part 3

Now it’s time to make the pinhole. For this I followed the methods described by SROYON on the 35mmc website ( https://www.35mmc.com/26/10/2020/making-measuring-and-testing-the-optimal-pinhole-pinhole-adventures-part-3-by-sroyon/). This is well worth a read as it explains a lot about how to decide what size pinhole to use, how to make them and various ways of measuring them. I’m not going to go into any of that since I can’t explain it any better. I’m just going to tell you what I did.

For the material for the pinhole I used the aluminium from a small soft drink can, it’s easy to cut with either scissors or a Stanley knife. I then used a fairly fine sewing needle to make the hole. I ideally wanted to get a pinhole diameter of 0.47mm which according to the theory would give optimum resolution for my focal length (100mm). I chose to go for maximum resolution rather than maximum contrast (see article above) as this would also give me a slightly lower f number, in my case a pinhole of 0.47mm would be f213.

I made four pinholes at a time using the method described in the SROYON article and went cautiously so as not to made too big a pinhole right from the start. I then measured the size of the pinholes four at a time to save scanning time.

In order to measure the size of the pinholes I used a marker pen to blacken around the pinholes and then scanned them next to a mm ruler at the maximum resolution of the scanner (1200dpi). I then cropped the scans as tight as I could whilst still including both the pinhole and the ruler in the image, see example below. Note the halo effect around the black of the marker pen and on the inside of the pinhole. I suspect this is a scanning artifact (excessive sharpening) so I ignored it and counted it as part of the hole.

Scan of pinhole with ruler
Close up of pinhole

I then enlarged this in Photoshop and while at maximum scale (1600%) measured the diameter of the hole ‘on screen’ with a ruler and then measured 1mm of the ruler scale again ‘on screen’. Dividing one by the other gave me the diameter of the hole.

For the pinhole I finally settled on, I measured the diameter of the hole to be (100±1mm) and the  1mm on scale of the ruler to be (203±1mm). Dividing one by the other I get a diameter of 0.49mm. I can only guess at the accuracy of this result but I would hope it is ± 5% which is ± 0.01mm. Close enough to the ideal diameter of 0.47mm that I was looking for and at a focal length of 100mm this means my aperture is f204.

It had taken me three attempts making four pinholes at a time, that is twelve in all, before I had made one close enough to the size I wanted.

The pinhole was mounted onto the large steel washer with double sided sticky tape and secured with more black tape, leaving the pinhole uncovered of course and then any shiny surfaces were blackened either with black paint or marker pen.

All of the internal surfaces of the three parts of the camera were then painted with two coats of matt black paint taking care to include the insides of the light traps and the ends of the centre box.

Now for the final assembly.

Small screws were fitted to the top and bottom of the backplate 30mm in from the edges, and similarly screws were fitted to the front plate to line up. It was here I realised that I need to add a small piece of wood to the bottom of the front plate so that the camera would be level when I rotated it from landscape to portrait. Here’s a picture of the final camera (it might get a coat of varnish at some time to finish it off).

Finally I made an adaptor to allow me to mount the pinhole camera onto a tripod. It has a block of wood shaped to fit the quick release of the tripod and a platform on which to place the camera with wooden ridges to stop the camera sliding backwards or forwards. This a such that the camera can be mounted portrait or landscape. The camera is then held on to the mount with (you’ve guessed it) rubber bands, nothing high tech here.

Now I need to get some film or paper and try it out.

Pinhole camera: Part 2

So the back of the camera which will take the film holder is all done apart from painting. The next jobs are to make the body of the camera and then the front plate which will hold the pinhole and the shutter.

The plan for the body is a simple open ended box made out of 6mm thick MDF which is glued together and then reinforced by gluing fillets of 8x8mm pine. It’s easier to show you a picture than it is to describe it.

The sides of the box were cut to length to fit into the light trap that I had previously glued onto the camera backplate and the fillets were cut short so that when glued in place would clear the light trap. In my case the MDF was cut to 150x96mm and 118x96mm. When gluing up the most important thing here is to make sure that the box is completely square in all dimensions. Once the glue was completely set I sanded both open ends on with a sheet of glass paper taped to a flat surface. This is to make sure that I get a good light tight seal with the front and back plates

The fact that I used 96mm wide MDF (which I just happened to have) means I will end up with a focal length of around 100mm which I estimate equates to an equivalent focal length of 28mm for a 35mm camera, so wide angle but not extremely wide. The plan here, if you remember, is that I can swap out this middle section and the pinhole for others to alter the focal length. In fact I also made a second body in exactly the same way and using the same materials except the mdf was 71mm wide giving me a focal length of 75mm. This equates to an equivalent focal length of 21mm for a 35mm camera.

Next the front plate to hold the pinhole and the shutter. Based on the external size of the back plate light trap a piece of plywood was cut to 170mm x 150mm. A light trap was then glued onto it using the same materials as before making sure that the centre box fitted.

I planned to glue the pinhole (yet to be made) onto a large square steel washer (45x45x2mm) to give it some rigidity and then mount it onto the front plate. To provide a mounting I glued thin strips of wood (just slightly thicker than the washer) to form a three sides of square and then glued wider strips of thin wood to hold the washer in place. Note that I had to cut away the edges of the holder to allow me to remove the washer from the mounting. A hole was then drilled part way into the front plate so I could push in a wooden peg to lock the pinhole in place

The centre of the front plate was marked and drilled to give a 20mm hole. The hole is this large to make sure that there is no vignetting of the image as the pinhole itself is to be mounted on the inside of the plate.

Finally I cut the shutter out of 6mm MDF according to the dimensions below. After gluing some felt to it, this was fixed to the front plate with a screw to provide a pivot and wooden stop to set the fully open and fully closed positions.

My decision to make a camera where I can change the focal length and pinhole has made this build more complex than otherwise. If you were happy with a single focal length and pinhole you could fix the pinhole to the front plate with glue or tape and then dispense with the light traps and just glue all three parts together to form a rigid box.

The completed front plate looks like this:

Next time I’ll make the pinhole.

Pinhole camera: Part 1

For quite some time I’ve been pondering over making my own 4×5 large format camera out of wood. As well as an interest in photography I also enjoy woodworking and have some suitable tools so it’s not unreasonable that I should combine two hobbies.

There are lots of examples of other people doing just the same to be found on the internet but the main issue for me has always been the cost of lenses for large format even second hand as I basically don’t like spending a lot of money on things just to try them out.

So instead I started to look at pinhole cameras. The advantage of pinhole photography is that there is no focus mechanism to worry about and so the level of accuracy (and therefore skill) is significantly less. Again there’s a lot of information out there but to my surprise not that much in the way of plans. So I decided that I would have a go at making my own camera and try to document it so that anyone else could do the same if they wanted to. The design I had in mind was a modular one consisting of three components: a front plate to hold the lens (pinhole) and shutter, a centre section which would define the focal length and a back plate to take the film holder.

I would fit light traps at the junctions between the modules and the pieces would be held together with elastic bands (no hi-tech here although I did consider magnets). Being a modular design would mean that I could change the focal length by changing just the centre section and pinhole without having to remake the front and back plates which are a bit more involved.

My first step, since I had decided that I wanted to build a 4×5 camera was that I needed to know the dimensions of a 4×5 film holder. (I don’t have the facility to enlarge these negatives but I imagined I could either contact print them or scan them on a flatbed scanner and then print them out using an analogue/digital hybrid workflow).

A look for dimensions of 4×5 film holders on the internet was not that forthcoming though some forums did give a few details, so I purchased a Fidelity Deluxe film holder second hand for £18 and measured it for myself. The measurements I took are shown in the diagram below, please note however, the measurements were taken using a fairly cheap digital caliper so I can’t guarantee absolute accuracy but these are the measurements I’m going to use for my build. All measurements are in mm.

The next job is to design and build the back plate of the camera to fit the film holder to allow attachment to the camera body.

This is the design for how the back plate will be built, not drawn to scale.

The timber I used was some hardwood that had been a doorframe in a previous life. I cut the pieces to thickness and width using a table saw and then to length with a mitre saw. A groove was cut into the piece marked ‘A’ with the table saw to accommodate the light trap ridge on the film holder.

The pieces were then glued together using pva glue and allowed to dry overnight before sanding to remove any excess glue and imperfections. The ends of the groove cut for the film holder ridge were filled with a plug of wood and glue.

When I tried the film holder for size it fitted quite snugly with the ridge on the film holder slotting into the groove I had cut for it.

Then, strips of wood were glued to the front face of the back plate to act as a light trap when attaching the body. (As this is a pinhole camera I could also use black felt in these joints as the exact focal length is not critical although I believe the light traps once painted black will be sufficient). The strips were 8x10mm hardwood (outer) or 6x6mm pine (inner) because that’s what I had available. Importantly though, they were glued so as to leave a channel 8mm wide to accommodate the body which I will make out of 6mm MDF.

All the internal surfaces including the light traps will be painted with two coats of matt black paint to cut down reflections and to fill any gaps in the joints to prevent light leaks.

When in use the film holder will be kept in place with a piece of plywood and elastic bands. I cut a piece of 8mm plywood to size (150x178mm) and then drilled pilot holes to take screw-in eyelets. These are so I can thread the elastic bands through to make sure the back doesn’t fall off or move around too much. On the other side I glued some 2mm thick foam to apply gentle pressure to the film holder. I would have preferred black foam but blue was all I had.

Next time I’ll describe how I made the body and the front plate.

Alderley Edge Miner’s Ramble

In the run up towards Christmas this year I took the opportunity to go over to nearby Alderley Edge for a walk in the woods there and I took my Zorki with me.

Alderley Edge is a popular place of people to wander around and get some fresh air and is looked after by the National Trust. On the top of a steep escarpment there are wooded areas and the remains of old mine workings. Over the years both copper and cobalt have been mined here. Some of the underground workings are apparently quite extensive but for safety reasons they are not open to the public. I suggest you look it up on Wikipedia if you’re interested

My walk was through the woods and then past what appears to be some old quarry workings.

Further along the walk skirts some fields and after following a narrow track (actually

more like a stream on this occasion) the path goes past a locked mine entrance before

opening up into an almost magical clearing (light dependent obviously).

All photographs were taken with my 1967 Zorki 4 using Delta400 film developed in DDX as recommended.

As a note of interest, the film was developed with a batch of DDX developer that had first been opened just over a year previously. I had taken care to remove air from the bottle and transferred the developer to a smaller bottle when I could. The bottle was stored in a dark cupboard in a cool room. Ilford suggest it has a significantly shorter life once opened but it worked OK for me. Had the film been of particular value to me I would have made the point to have used fresher stock.

Biddulph Grange

I visited Biddulph Grange in September when the gardens were reopened to visitors and took my Zorki 4 along with me.

Biddulph Grange gardens were developed by James Bateman using money he inherited from his father, who had become rich from coal and steel businesses. James Bateman moved to Biddulph Grange around 1840 and created the gardens with the aid of his friend and painter of seascapes Edward William Cooke. The gardens were to display specimens from Bateman’s extensive and wide-ranging collection of plants brought back by the great Victorian plant-hunters.


In 1861 Bateman and his sons, who had used up their savings, gave up the house and gardens, and Bateman moved to Kensington in London. Robert Heath bought Biddulph Grange in 1871. After the house burnt down in 1896, architect Thomas Bower rebuilt it.
After 1896 the house served as a children’s hospital from 1923 until the 1960s and then until 1991 the house and gardens housed an orthopaedic hospital.


In 1988 the National Trust took ownership of the property and its gardens, which have now been nearly fully restored.

Zorki 4 image (slide right) vs Mobile phone image (slide left)

Above is a comparison of the film camera image with a mobile phone image. The film image looks a little less sharp which I think is down to the lack of any coating on the Jupiter 8 lens causing some flare (I have received a lens hood as a Christmas present). I have also reduced the sharpening on the mobile phone image a little as I felt it was excessive.

Photographs were taken with a 1967 Zorki 4 with a Jupiter 8 50mm f2 lens using Ilford Delta400 film, developed with DDX as recommended.

St Mary’s Lighthouse

It’s been a while since I last posted as I haven’t been going out too much because of Covid-19 and I’ve been spending a lot of time working in the garden. Now that it’s getting colder I thought I’d look through some photographs I hadn’t published before and post them.

Much the same time as my trip to Newcastle, I also went to the northeast coast. It’s got a lot going for it – great scenery and long sandy beaches – especially if the weather is good. I took along my Pentax P30T and the kit zoom lens.

St Mary’s Lighthouse taken from the causeway

St Mary’s Lighthouse is on a tiny island just north of Whitley Bay and is linked to the mainland by a short concrete causeway which is submerged at high tide.


The lighthouse and cottages were built in 1898 on the site of an 11th-century monastic chapel and was finally decommissioned in 1984.

Be prepared to climb lots of stairs if you want to go to the top.


St Mary’s is now open as a visitor attraction with a small museum, a visitor centre, and a café. It is possible to see seals on the rocks at times.

Not far away is the village of Seaton Sluice where a cut in the rocks was made in 1763 to allow better use of the small harbour.

View of the ‘Cut’ at Seaton Sluice

All photographs taked with a Pentax P30T with f3.5 28-80mm Pentax-A zoom using Ilford Delta400 developed in DDX as recommended. Negatives were scanned using an Plustek OptiScan 8100 scanner.

A second outing with my ‘new’ lens

Following on from my trip around Bollington, Cheshire to try out my newly ebay purchased 50mm 1.7 Pentax-A lens, I went out again this time exploring some of the staircases in Macclesfield which connect the lower part of the town, where the railway station is, with the main town square. Another cold dull day but this time at least it wasn’t misty so perhaps I could get more of a chance to see what this lens is capable of.

The “108 Steps” rising up to St Michael’s Church
Back down via Step Hill

Looking downwards at the halfway point of Step Hill
and looking upwards.

Bottom of Step Hill
Third set of stairs leading up to Brunswick Street

So a set of photographs with the general theme of staircases in Macclesfield. I was pleased with the way my ‘new’ lens handled. I found the camera far more balanced than with the zoom lens and I didn’t find being fixed to 50mm focal length at all restrictive. The results from the lens look good to me but I feel as though I haven’t really put it to a proper test yet.

All photographs taken using Ilford Delta400 and developed in DDX as recommended.

Trying out my ‘new’ lens for the Pentax P30t

I finally got out to try my ‘new’ 50mm lens as a replacement for the 28-80mm zoom lens which I found just too clumsy and awkward. The day I chose may not have been the best but I wanted to go out, so on one misty morning I did just that. I had a walk around sites related to both the Macclesfield Canal and the Middlewood Way in Bollington, Cheshire.

Macclesfield Canal from the top of the steps in Grimshaw Lane, Bollington.
Looking in the other direction.
View across the viaduct on the Middlewood Way.
A road bridge across what was once a railway line.
A lonely figure walking along the Middlewood Way.
The same photograph but with added contrast and sharpening.

I like the effect the mist gives to these images, I can still feel how cold and damp it was that day. My favorite has to be the lone walker who is about to disappear into the mist around the corner. My only problem is that I can’t decide which image I prefer – the softer one which gives a good impression of the mist or the more contrasty one which seems to isolate the figure more.

As for trying out the new lens, I was pleased with the way it handled and the better balance it gave to the camera. However, I realise it wasn’t the best day to test out a lens that has been praised for its sharpness.

All photographs taken using Ilford Delta400 and developed in DDX as recommended.

Some photos from Newcastle

While I’m waiting for an opportunity to try out the ‘new’ 50mm f1.7 lens I bought on Ebay I thought I’d share some photos taken in Newcastle at the end of October last year.

It was actually a bright sunny day unlike many of the times I’ve been out and about taking photographs.

A view over the river to the Sage. There are four iconic bridges here, it’s just that I’m standing on one of them
The same view a couple of minutes later taken on my mobile

I like both of these photographs although I think the one taken on the mobile would look better if I reduced the colour saturation a little, the image processing in my mobile is a bit too enthusiastic at times and makes things appear much brighter than I remember.

Some old steps just beyond the Side Gallery
Holy Jesus Hospitalbuilt in 1646 now offices of the National Trust

Newcastle is a great place for photographers with no end of things to take pictures of. These were just a few.

All photographs were taken with a Pentax P30t using Ilford Delta 400 and developed in DDX for the recommended time.

A new lens for the Pentax P30T

Those of you who read my post about buying the Pentax P30T might recall that I was unsure about the 28-80mm f3.5 zoom lens I had with it. I felt it was a little heavy to carry as a general go-to lens and that it upset the balance of the camera.

Well, the more I used the camera the more I felt that was the case, so I had a look around for alternatives. For a 50mm lens there was a choice between the Pentax f2 and f1.7 and in order to keep full functionality with the camera I only looked at Pentax-A lenses only. I got the impression (from comments and reviews online) that the better lens was the f1.7 but that the f2 was no slouch either, so I chose to look for both and take whichever one came along first.

A quick survey of Ebay sold listings suggested that I should expect to pay around £20 for an f2 lens and £31 for the f1.7, so these were the target prices I set myself. After a few failed attempts to buy either lens, where I was outbid and the price went over my target, I saw an f1.7 lens with a minimum bid of £14.95 with £3.50 postage with only 1 day to go in the auction and there no bids so far.

I think the reason for no bids at this stage was the ‘high’starting bid and the very brief description which basically just said ‘used‘ and gave no real clues as to the actual condition of the lens. I looked closely at the photographs (which in fairness were of good quality unlike so many on ebay) and so thought it was worth taking a chance. The next day, just 30 minutes before the end of the auction, there were still no bids so I put in my bid and won uncontested.

When the lens arrived in the post a few days later, well packaged in bubblewrap and a stout homemade cardboard box, it looked to be in a good used condition (a few marks here and there but no damage) with everything working and nice clear optics. Not bad, an f1.7 50mm Pentax-A lens for £18.50 including postage, a ‘saving’ of 2 or 3 rolls of film.

On the camera it both looks and feels good, the balance is so much better. I’ve yet to try it out with a film but I’ll report back when I have. In the meantime, here are some photos of it.

Much smaller and neater.
Soooooo much smaller.
Optics nice and clear and no sign of fungus.

All I need now is some film.

Trying Delta 400 in the Pentax P30T

The next time I took the Pentax out I loaded it with Ilford Delta 400 film as a change. I wanted to see if Delta 400 lived up to its promises of still giving less obviously grainy results despite its greater speed due to its reported different grain structure. I quite liked the idea of standardising on a faster film as I can’t remember ever having problems with too much light as opposed to too little light whilst taking photographs in the UK. I would develop it using DD-X as recommended by Ilford and then scan with limited sharpening to give it the best chance.

This time I was visiting Witley Court in Worcestershire. Witley Court was once a grand house which had been hugely extended and remodelled by various owners since it was first built in the seventeenth century but, after a serious fire in 1937, it was abandoned and stripped of fixtures and fittings. Now in the hands of English Heritage, it has been made safe and secure as a spectacular ruin. There is also an elaborate fountain in the gardens which has been restored to full working order and operates at times throughout the day.

Here are some of my photographs from Witley Court, taken on a typical British summer’s day – cloudy with intermittent showers.

Front view of the house. Pentax P30T Ilford Delta400 DD-X

Approaching from the front of the property, it becomes apparent how extensive it really is. The view from the rear is even more impressive.

Rear view of the house. Pentax P30T Ilford Delta400 DD-X
Interior Pentax P30T Ilford Delta400 DD-X
Fountain from the rear steps of the house. Pentax P30T Ilford Delta400 DD-X
Fountain from the grounds. Pentax P30T Ilford Delta400 DD-X

I’m reasonable impressed with the results I got from Delta400/DD-X. Initially there seemed to be some excessive grain showing in the sky for the last two photographs but I went back and scanned them again, this time with the sharpening disabled completely to see if it was really grain or a scanning artifact. The grainy appearance was significantly reduced, but I really need to get a handle on setting up the correct scanning parameters to get the best results first time.

I’ll try Delta400 some more in the future.

More from the Pentax P30T

Not long after my first outing with the Pentax P30T, I went across to Speke Hall next to Liverpool’s John Lennon airport. It’s another National Trust run property, an interesting 16th century manorhouse which I think photographs well.

Once again it was another mixed day, mainly cloudy with a little bit of sunshine here and there which meant that the contrast levels were going up and down. I was using Ilford Delta100 again which was then developed in DD-X as previously. The negatives were scanned using my newly acquired Plustek Opticfilm 8100 with minimal sharpening at this stage. I had already learned that left to it’s own devices the scanner would occasionally sharpen so much that it would give the appearance of excessive grain.

Here are my photographs from Speke.

Pentax P30T Delta100/DD-X

Altogether a pleasing set of pictures but I was frustrated by the alternating sun and cloud which made the photographs look as though they had been taken on different days.

I’m getting to like this camera, it’s easy to use and gets good results. Still not sure I like the balance of the camera with the zoom lens but it does help in composition.

First film through the Pentax P30T

As I was keen to try out my newly purchased Pentax P30T, I loaded it with a roll of Ilford Delta 100 film and went off to nearby Little Moreton Hall, a National Trust run property in Cheshire.

It was a bright but cloudy day, no sunshine but plenty of light, ideal for photographing this timbered Tudor manor house.

All in all, I’m pleased with the camera. I used it in aperture priority mode and found it quite simple and easy to use. The hardest part was remembering to wind on after many years of using digital cameras. I did find the zoom lens useful for composing the shots but a little heavy, I think I might see if I can get a 50mm f1.7 or f2 lens for a good price.

The film was developed at home – the first time for probably 40 years using Ilford DD-X developer (1+4 10.5min at 20C) and the negatives looked well exposed. I did try to digitise the negatives by photographing them using a Canon 1000D and a Jupiter 8 lens (see an earlier post for more details) but I wasn’t satisfied with the results so the negatives got put away until I had a suitable alternative.

Once I had my own scanner, I scanned the negatives using the Plustek OpticFilm8100 at 3600dpi using the settings suggested by the manufacturers and applying only a modest amount of sharpening. The images above are as they came off the scanner with no additional post production apart from cropping.

Overall I’m quite pleased with the results although I think I might go back and experiment a little to see if I can make the images a little crisper.

My second “new” film camera

I didn’t intend this to happen but looking through some blogs on film cameras the other day made me think that a second film camera might not be a such bad idea just in case I have problems with the Zorki again.

Reading through various suggestions it seemed to me that a Pentax K1000 might be an ideal choice – it has proved to be popular with photography and art students and there are lots of excellent lenses available at not too stupid prices. I also liked that it would be a different style of camera to the Zorki, i.e. an SLR rather than a rangefinder. Checking the prices and availability on ebay however brought out my miserly streak, I’d rather spend my money on film, and so I started looking for something a little cheaper.

Enter the Pentax P30T – a quite capable camera from an unloved period in camera design, it came from a time when cameras were starting to be made of plastic rather than metal but before autofocus really came in. So, it’s made of plastic and doesn’t really have any style or character about it, it just doesn’t match up in carisma to the K1000 but it doesn’t weigh as much either. It also has an electronic shutter so needs a battery to work at all, but it’s a common battery that’s readily available. On the plus side, it can be used in fully auto mode, aperture priority, shutter priority or fully manual and comes with the standard Pentax bayonet mount. If you want fully auto mode you need to have Pentax-A lenses but if you want to have some control (which is the whole point, isn’t it) you can use almost any Pentax bayonet fit lens. Apart from the fact the film speed is DX coded and can’t be easily cheated except in fully manual mode, what’s not to like.

After a short hunt, I got one from ebay complete with a Pentax-A 28-80mm f3.5-4.5 zoom lens for just £15. But it turned out there was an issue. Despite being advertised as “in fully working order” occasionally the shutter cock/wind on interlock didn’t work meaning you could sometimes wind on two or three times before the shutter cocked. Not very economical on film! I emailed the seller several times over a period of two weeks asking for a refund on the grounds of ‘not being as described’ but got no reply from him at all. In the end, as the cost wasn’t large, I put it down to the lottery that ebay can occasionally be, at least the lens was OK so I hadn’t shelled out £15 for nothing. (I have since discovered the seller is no longer registered with ebay – I wonder why that might be?).

For my second attempt I bought a P30T body only from a different seller for the princely sum of £5.20. However, prior to shipping it to me, he emailed to say that he had found a crack in the baseplate which he had then glued and did I still want the camera as the repair looked a bit unsightly (he even sent me a photograph). As a sweetener he said he would add a strap for free and take £2 off the price. Needless to say I said yes.

Here are some pictures of the second camera.

The plastic body of the camera has a few scuffs and scapes here and there which gives it a well used appearance. The crack on the baseplate doesn’t look too good but is it secure and to be honest who’s going to see it other than myself. The important point to make here is that this camera was not bought as a collector’s piece to sit on a shelf and be admired. This is a camera that should be quite capable of providing good quality photographs that is going to get used in all conditions. I like to think I have saved it and given it a new life. If the worst happens and it gets broken then I’ll buy another one!

Once a battery was fitted it fired up properly and everything appears to be working well – again I need to put a film through it before I know how good it actually is. I’m not too sure I like the size and weight of the zoom lens so I might be on the lookout for a 50mm lens for it soon, but I’ll decide on that once I’ve put the camera through its paces.

Now I have a scanner of my own

In my last post I tried to compare the quality of commercial scans of my 35mm negatives with various home brewed low cost alternative methods.

The overall conclusion I came to was that none of the alternatives I tried were really up to the job so after much research and several changes of mind I put a Plustek OpticFilm 8100 scanner onto my Christmas list and waited.

I can only assume I’ve been good this year as the scanner was among this years Christmas presents. I’ve only had a short time to play with the scanner so far but what I have done is to scan the very same negative that I used for my comparison of home scanning methods without spending a lot of time trying to enhance the image afterwards. Below is a comparison of the commercial scan with my own home scan with the Plustek OptiScan 8100 obtained by using the workflow recommended by the manufacturers and no manipulation of the image afterwards.

A side by side comparison shows similar results, a little more contrast with the commercial scan but remember I have done nothing ‘post scan’ to the image on the right. A close up comparison is shown below.

Again the home scanned image looks to have less contrast but also less ‘noise/grain’ which leads me to think that the commercially scanned image has been sharpened quite aggressively and maybe the excessive grain I was commenting on earlier was not grain at all.

Remember that this is only one single comparison.

I now have a few films to scan before I can comment further.

Scanning my negatives at home – a trial.

Having decided to develop my own black and white negatives at home – partly to save a little money but mainly so I could experiment with film/developer combinations to find a combination or combinations I liked – I was then left with the problem of how best to convert the negatives into prints.

I had already decided I didn’t want to get back into the whole darkroom set up that I once had. That meant that the best route for me was to scan the negatives somehow and then invert and adjust the digital images so I could either print out the results myself or send the files off to be printed elsewhere. So, how best to scan the negatives.

Warning. I am aware that what I describe below isn’t a proper scientific test and that the conclusions are subjective, but, I did it for my own interest.

As a trial I took one negative and tried different ways of scanning the image at home with equipment I already had and then comparing the images with the result I had gotten from commercial scanning. In all honesty I didn’t expect any of the home solutions I had available to be satisfactory.

As well as the commercial scan, the other methods I used were:

  1. Scanning on a fairly cheap flatbed scanner (HP Photosmart 5520 All-in-one) covering the negative with a sheet of white paper and shining a lamp on that to provide a suitable backlight. I used the maximum resolution of the scanner which was 1200 dots per inch.
  2. Photographing the negative using a Canon 1000D digital camera which I had fitted with the Jupiter 8 lens from the Zorki. I managed to do this by glueing a plastic Canon body cap to a 39mm lens rear cap and then cutting a hole in the resulting adaptor for the image. By chance this also moved the lens to where its focus was just about right to get more or less the full frame onto the sensor. The negative was mounted and back lit and the image captured in RAW setting the lens to f8 (in the hope that this would be around its sharpest aperture). Focusing was difficult to say the least even when using ‘live view’. There’s a picture below of the adaptor I made and the very Heath Robinson rig I put together to use it.
  3. Following on from a blog I had seen ( https://cameralegend.com/tag/how-to-scan-film-without-scanner/ ), the third method I tried was to backlight the negative on a light table (really just a low wattage bulb behind some white plastic) and photograph it with my mobile phone (Lumia 640, i.e. nothing special). I got as close as the auto focus would let me and took a couple of shots refocusing between them for good measure.

Here are the results of all of the scans after inverting and adjusting the levels so that both ends of the scale are on the point of clipping:

To be honest, looking at the results displayed on the screen side by side, I was surprised that the differences weren’t greater given the fact that I spent virtually no money on this.

My overall conclusions are this:

The commercial scan (6.3 megapixels), as expected, produced the best overall result. There is detail in both the shadows and the highlights with an acceptable overall contrast.

The flatbed scanner has given the least pleasing result in that much of the detail in the highlights has been lost as well as some contrast. Also given the resolution of the scan (it should be 1200 x 1800 pixels), it is the least resolved image which most likely wouldn’t stand up to enlargement.

The Canon 1000D photograph gives an overall acceptable result, there is a little loss of contrast which was difficult to recover without giving an unnatural look to the image. The detail also looks a little soft, probably a result of the Jupiter 8 lens used and because no sharpening has been applied. The negative filled the viewfinder so made full use of the 10.1 megapixel sensor.

The mobile phone image, I think is astonishingly good when you consider how quick and easy it was to obtain. I’m not sure it would stand up to much enlargement as the image of the negative only took up less than half of the picture (say about 3 megapixels out of 8 megapixels) but it is a quick way of looking at your film to decide which pictures to scan under better conditions.

Here are some enlargements of a section of the above images:

Once the images are enlarged the superior quality of the commercially scanned image stands out. The flatbed scanner image is showing horizontal bar artifacts from the scanning process, the Canon image is just softer and shows less detail and while the mobile phone image at first sight is the second most acceptable it is showing halo type artifacts most likely from the image processing in the phone. Add to this the fact that the native resolution of the images from the flatbed scanner and the mobile phone is significantly less than the commercial scan or Canon images thereby reducing their potential for enlargement.

Probably I could have got more pleasing results had I spent more time ‘correcting’ the images but I wanted to do a simple comparison of the scanning methods. Also, I am sure that if I had had better equipment to hand I could have obtained better results with each of my home brewed alternatives. Certainly there are better scanners out there and the use of a digital camera to capture negatives as an alternative to scanning is becoming more popular. With suitable equipment (perhaps a more modern camera and a macro lens) I am sure I could have got much better results. I just don’t have that equipment available to me.

So I still need to solve this problem although for now I can at least do something to convert my negatives to view them even if it’s not good enough to give me photographs I can enlarge. I’ll just have to wait and see if Santa has any ideas on what to do next.

I decided to start developing my own film

You might have gathered by now that I didn’t really like the combination of contrast and grain I was seeing from the Delta 100 film that I was having commercially developed and scanned, so I started looking for some equipment on ebay so that I could do my own processing. I already had a few bits and pieces such as measuring cylinders and a thermometer left over from the last time. (I knew they’d be handy one day – it was just a miracle that I managed to find them 40 years and several house moves on). All I really needed was a processing tank and a good sized changing bag.

After watching out for processing tanks on ebay for a week or so to get a feel for the going rate, I put in a bid for a collection of three Paterson tanks and won. Here they are – cost £5 plus £5.50 postage – all complete and in excellent condition. Not bad when you consider a new one would cost £20 or more.

I had originally thought I’d just keep one tank and sell the other two to get my money back but then decided it wasn’t really worth the effort so I now have spares.

When it came to a changing bag I couldn’t find a second hand one so I bit the bullet and bought a new one.

The choice of reagents actually proved to be straight forward. I looked up Ilford recommendations and chose DDX developer (expensive or what) as this seemed a good place to start. I also bought some food grade citric acid to make up a stop bath (1 teaspoon or roughly 5g in 400ml), cheaper than commercial stop bath and odourless unlike the acetic acid based ones), Ilford Rapid fixer and some Fotospeed branded rinse aid.

So now I’m ready to develop my own negatives but how do I get prints. Getting negatives scanned commercially seems to be rather expensive if it isn’t part of a develop and scan deal and of course you have to factor in postage costs too. I’ll need to find a solution.

Design a site like this with WordPress.com
Get started